
My build of a CNC router based on the C-Beam Machine bundle. This is still a work in progress.
I made myself a custom table with drawer using a tool stand from Harbor Freight Tools as a base.


For electronics I used a Gradus M1 PRO controller board from Panucatt Devices with BSD109A stepper drivers. I also used a 24V PSU I had on-hand.


I made custom mounts to use some micro switches as hard limits at both ends of all three axes.


I initially tested the system with a custom drawing adapter and a Sharpie marker, but the attached video is my first ever actual CNC process.
UPDATE 7/16/2017
I added my RaspPi/bCNC controller.


UPDATE 7/18/2017


1) Added acrylic side panels and an MDF rear wall.
2) Relocated PSU to table base.
3) Added a 24V-->12V converter to power future 12V accessories.
4) OpenBuilds spindle light ring powered up.
5) Controller board mount/cover completed.
7/19/2017
I spent today working on a sign. Had to learn how much support you need to leave in MDF so that it doesn't just get chipped away.


Still to do:
- DONE: Add Plexi side panels and rear wall to contain chips as much as possible.
- DONE: Fix/reprint controller board mount, and create/print cover for it.
- DONE: Add Raspberry Pi w/ touchscreen and bCNC software so I do not have to keep my laptop connected during cuts.
- DONE: Add power strip to stand for power to all devices.
- Add dust/chip collection system.
- Learn how to properly program my cuts to maximize speed while producing quality end results.
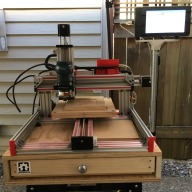
BD's C-Beam Machine CNC Router (WIP)
Build in 'Cartesian Style CNC' published by Bruce Walker, Jul 20, 2017.
CNC router table based on OpenBuilds C-Beam Machine bundle.
-
-
Build Author Bruce Walker, Find all builds by Bruce Walker
-
- Loading...
-
Build Details
- Build License:
-
- CC - Attribution NonCommercial - CC BY NC
Reason for this Build
I got into 3D printing about 1.5 years ago. I love seeing my creations go from design to physical product. Of course, sometimes I want to create something that just would not be strong enough made with FDM manufacturing. Also, some things would just look much nicer made out of wood or metal than plastic.
In building, modding and using 3D printers I realized how much of that knowledge was also applicable to CNC machines. So it seemed a logical step to add a benchtop CNC machine to my arsenal. -
Parts list
Qty Part Name Part Link Comments 1 OpenBuilds C-Beam Machine Mechanical Bundle http://openbuildspartstore.com/openbuilds-c-beam-machine/ Link Purchased w/ 3 NEMA 23 stepper motors 1 Gradus M1 PRO https://www.panucatt.com/product_p/gm1pro.htm Link 3 BSD109A Bigfoot Stepper Driver http://www.panucatt.com/product_p/bsd109a.htm Link 1 Universal Tool Stand https://www.harborfreight.com/universal-tool-stand-69805.... Link 1 22" Soft-Close Drawer Slides https://www.amazon.com/gp/product/B015GMRIE2/ Link 1 Bosch Colt Palm Grip Router https://www.amazon.com/gp/product/B000ANQHTA/ Link 6 Momentary Hinge Roller Lever Micro Switch https://www.amazon.com/gp/product/B00MFRMFS6/ Link 1 24V 20A Power Supply https://www.amazon.com/gp/product/B01B1PRE60/ Link