Motivation
I've built a couple of Prusa I3 style printers. They worked well but I was constantly calibrating and tweaking stuff. Plus the Mega2560/RAMPS platform is dated and has really hit the wall in keeping up with the state of the hobby, IMO.
After checking out Marshall Peck's Voxel OX I was hooked. Now I had my next project. Of course being Maker's we can't leave well enough alone so I added my own touches and improvements (at least I hope they're improvements).
The images below are from my first attempt at building a V-slot pinion drive printer and is the basis for the current build. I also used it as a test bed to check out different elements of the printer to experiment with. The things I learned are:
- 110v AC silicone heat beds are the bomb. I'll never go back to a PCB heater. It can get up to 150C in about five minutes using 4mm build plate and 5mm borosilicate glass.
- The pinion drive is awesome. It's fast, smooth and quiet. I consistantly print at 80-90mm/sec.
- The single motor belt driving two lead screws for the Z axis is a winner. I was concerned if a single motor would have enough torque to handle both screws, but the Z axis can fast move at 40mm/sec. Plus both towers are in perfect sync.
- The Duetwifi is a huge step up from a RAMPS system. Once it's all wired up and running you never have to touch the hardware. Everything is done through a web interface. Every bit of configuration is done through the Reprap firmware web interface using text files and macros.
![[IMG]](proxy.php?image=http%3A%2F%2Fi.imgur.com%2Fh7Ziaxdm.jpg%3F1&hash=f399b3055fb543ba6cc3ba0e399d5b0a)
![[IMG]](proxy.php?image=http%3A%2F%2Fi.imgur.com%2FA4xzCvHm.jpg&hash=355504c2cf2e785d34601d478c1330f3)
![[IMG]](proxy.php?image=http%3A%2F%2Fi.imgur.com%2FbKAeUXym.jpg&hash=61ef2966707c8fa7263e6a159089578e)
Build Highlights
- Duetwifi ARM based controller
- Single motor belt driven T8 Z-axis
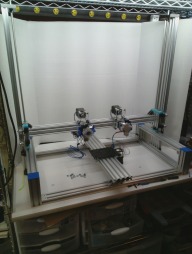
- DUAL X-axis pinion drive for maximum X movement
- Bltouch Z height sensor
- 400x400x400 build volume. Very expandable.
- X carriage is made from 20x20 V-slot for tool mounting flexibility
- Two E3D Titan Aero extruders with Volcano hot ends
- 110VAC silicone heatbed
- Build Plate: Cast Aluminum Tool Plate (ATP 5)
- Build Surface: Ultem PEI (no more glue or tape)
- Very scalable. Easily adjust X,Y & Z dimensions to suit your needs.
Painful Lessons
Originally I planned to use all standard lengths of V-slot since I didn't have any way to cut the aluminum. All the special length of extrusion that didn't need to be V-slot were ordered from Misumi, pre-cut to order.
I found out half way through the first iteration of the printer that Openbuilds will always give you at least the length you purchase but invariably it's a few millimeters longer. Rarely are two pieces the same length which tends to make it tough to get things to align. Needless to say, I now cut all my extrusion to the length I need. I order it from Openbuilds in 1000-1500 mm lengths.
As with anything you make, having the right tools makes your life much easier. After a bit of research I soon found all that I needed was a high quality blade for my 10" miter saw. This is the one I bought. Don't cheap out, it's not worth it in the long run. Now I can cut V-slot just as easily as I can cut a 2X4. Don't forget to use cutting lubricant of some kind.
Example of the cut quality with the Freud Diablo blade
The Build
Closeup of single X carriage. I made the carriage from laser cut 6mm acrylic and incorporated an adjustable motor plate so that the verticle height can be adjusted to align the nozzles.
Both X carriages sharing a single belt. They can move simultaneously and in different directions. Here is a link to Openbuilds pinion drive video that convinced me that this will work.
Closeup of Z axis carriage. I cut a section of 2080 V-slot to use as a carriage. It makes it easier to mount stuff without having to insert screws through the back of a standard plate. I also make a plate to mount a standard brass leadscrew nut. I'm experimenting with a 2mm single start leadscrew to get maximum resolution out of the Z axis.
The Z axis is driven by a single 0.9° (400 per revolution) NEMA 17 motor driving both leadscrews through a continuous endless loop GT2 belt. Belt adjustment is very easy. Combined with the 2mm leadscrew screws give the Z axis a step length of .005mm. At 1/32 uStep that gives 6400 steps/mm.
Gotta get back to it. I'll post more as the project moves forward. I hope to have it come to life within teh next couple of weeks.
BF3D OX (Big Freakin' 3D OX)
Build in 'Cartesian Style Bots' published by Bud Griffin, Jun 3, 2017.
This is my latest printer build. The second printer I've built using V-Slot.
-
-
Build Author Bud Griffin, Find all builds by Bud Griffin
-
- Loading...
-
Build Details
- Build License:
-
- CC - Attribution - CC BY
Inspired by
This is my 3D printer build that was inspired by the Voxel OX.
![[IMG]](proxy.php?image=http%3A%2F%2Fi.imgur.com%2FRiqnSMH.jpg&hash=6777c595dfa94d1204a9b70b5fce2139)
![[IMG]](proxy.php?image=http%3A%2F%2Fi.imgur.com%2F4qrvEpfm.jpg&hash=96ffa0c4c7b26157701eb541f95b9e5a)

