
Had some 3D Parts built on Thingverse in ABS for the motor mounts and pillow blocks constructed of 8020 tubing 1/4" plate aluminum and Printed ABS parts have a 3 extruder mount built. Also looking forward to trying a hinged extruder mount in abs.
The prototype corexy was built on ¼” plywood and the top plate will be ¼” aluminum plate the center portion of the top plate will become the table. Begin testing with a single extruder Made provison for 3 exruders side by side. Plan is to install a Diamond 3 in one extruder. had to replace the Series 17 motors due to quality / consistency issues Installed X& Y and 3 Z motors to lift the platform capabile of lifting 15 lbs mounting the Z-Axis motors completed.
Cut out the the top Plate (COREXY) platform made sure all of the clearances calculated the hard way still no Cad program use a PCB program to align the holes unfortunately somehow one the 3 8mm rods got a little bent replaced *TRe2 rod at 800mm hard to find that long have to have them cut from a 1000mm rod 2nd issue have no idea why the ramps and the 4988 or 8825 drivers wont turn my 1.7a motors at 0.8v had an issue with the Stop switches repaired one of the Stop switches mounts had broken clean that you could not tell it was broken (fixed) using Repetier all 3 z motors are an 17HM19 0.9degree with 1.6a at 64oz found an issue was in the configuration file had not programmed the area of travel for X,Y, Z working now installed home ends stops a z Max end stop to prevent traveling all the way down to 660mm
a lot of people don't realize you don't need the corner brackets at all none in my design the screws are in the head 1/4-20 ride in the rails to position all you need is one hole to tighten the button head screw down and the screws are in the rails so none of the drilled holes have any crossing screws 4 separate rails on each post and 4 screws and done wish i could show more then one photo :>) This design is completed and fully functional
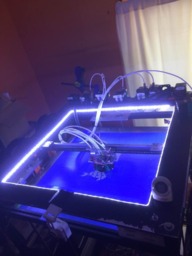
CoreXY 3D build one
Build in '3D PRINTER BUILDS' published by recoush, Sep 20, 2019.
an 8020 build with 1010 extrusion (1") Square tubing Rough size is 24x24x36 (600x600x900) The expected usable print area 21.5x21.5X32"roughly (510x510x760) An XY 3D printer with 3 extruders and 3 Z-axis 0.9 degree motors the table (Z-AXIS) will lift up to the XY Carriage on 3 12mm linear rod and 3 8mm Lead screw's Corexy designs complete and Z-axis build is started don’t have a 3D cad system yet so building my prototypes on a pcb layout tool
-
-
Build Author recoush, Find all builds by recoush
-
- Loading...
-
Build Details
- Build License:
-
- CC - Attribution - CC BY
Reason for this Build
an outside of the box idea, based on the fact there are very few responsible good sized inexpensive 3D printers. however as with most projects the cost of a project is not a financial value but a source of pride in the accomplishment factor upon completion of a working design, regardless of the monetary values.Inspired by
The beast -
Attached Files:
-


