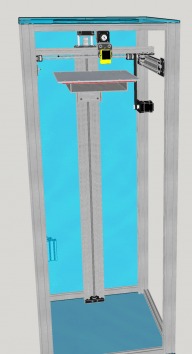
2/15/17 After building the M3Delta, I have decided to try my hand at making a cartesian style printer. I am using a screw for the z axis and belts for the x and y axis. Hopefully I will be able to better document this build for the betterment of all. Step one was designing the build and I used sketchup for the design. I went ahead and set it up for a 750mm z axis because I already had the 1000 screw drive bundle from open builds to use. If anyone sees an issue with the design let me know. I did design the y axis to use an 8mm rod to drive both sides, but it may be simpler just to use two motors, so that part is debatable.
2/18/17 Why we iterate. Because I am planning to make the plates out of aluminum, I have been making the protypes out of plastic using my other 3d printer.
The first one is taken from the sketchup files and modified to reduce material, but I ran into a problem where the round head screws I have are rubbing the rail. The next one was created using fusion 360 and the holes for the screw were too big. The last one works, but going back to the orginal concept, I want to reduce the material used.
2/22/17 Aluminum extrusions cut and attached for initial frame. Looks like the 400mmx8mm rod should work without major modifications. Still need to measure, remeasure, and then cut supports for the y axis. Also, need to decide whether I will use acrylic or aluminum to make the corner braces. Aluminum is rigid, but takes longer to make (plus how many bits am I going to break making the plates), acrylic can be done on the laser cutter but is not as durable or stiff.
3/21/17 Still working on printer and have made some progress despite killing my Solidoodle 2. The printer lasted 4 years and I finally burnt out the board, so I was pretty happy with it. Decided to change the design on the mounts and went with acrylic for the time being because it is easily available from the DIY store down the road, should stand up to initial wear and tear, and if it doesn't work, I will have the files to eventually make them from aluminum. Will be posting pictures of the progress. Please note the braces to stiffen the frame, the y-axis motor mount, and the modification to the linear actuator end mounts (drilled the pulley hole to 8mm for the 400mm x 8mm rod). I also have a mount for the hot end in the works.
4/5/17 Good news/ Bad news. Laser cutter is down and needs to be repaired, so the supports in acrylic are on hold. Finished modifying the Y-axis and have tested the x and y axis to make sure they work. I am getting some jumps on the x axis and may be modifying it. seems the linear actuator mounts are the cause. Contemplating going with rods and belt modification.
4/9/17 Trying out some ball bearing support for the rod that drives the y axis. If successful, will post the pieces and modify sketchup file to reflect changes
5/23/17 Working slowly on changes, but I am liking the new y axis drive. added the extruder mount and endstops. Interesting how the plans have changed since the initial sketchup. Will add the new sketchup file with the changes.
M3D Squared
Build in 'Cartesian Style Bots' published by Limine3D, May 23, 2017.
A cartesian build with a build dimension of 200x200x750mm. I will be using a dual extruder, heated build plate, and a screw drive for the z axis.
-
-
-
- Build Progress:
-
- Build in Progress...
Attached Files:
Steven Stremel, Mark Carew and MaryD like this. -
-
Build Author Limine3D, Find all builds by Limine3D
-
- Loading...
-
Build Details
- Build License:
-
- CC - Attribution Share Alike - CC BY SA
Reason for this Build
Its a challenge. I went to a makerspot here in Durham NC where I was told that they 'frowned' on kit builds, but everyone there had a Prusa build. So I built the M3D from scratch, and now I am doing the same with the M3 Squared!Inspired by
Solidoodle 2 -
Attached Files:
-


![[IMG]](proxy.php?image=http%3A%2F%2Fimgur.com%2Fa%2FaQRTp&hash=6eca247fcf31842cfe9c2156e414e5b2)


