I'm excited to build my first CNC Router.
Below you can follow my progress.
5/20/16 - Ordered plates from Clockwerk Machining. OX CNC- Aluminum Plates
5/25/16 - Received my plates very quickly.
5/29/16 - Used a wire wheel on the plate edges, then used some aluminum oxide sandpaper on a disk with a drill to put a spiral pattern on the plates.
5/31/16
More parts were at my doorstep when I got home from work! Added wheels to the gantry plates.
6/11/16
Mounted my Dewalt DWP611 in a Blue Ox Solutions (Chris Laidlaw) mount.
Worked on the front plate wheel assembly:
6/12/16
Received my Raspberry Pi 3 in the mail. Started with a Raspbian Jessie image. Configured the built in wifi using the graphical interface. Then in a terminal window I typed:
wget https://github.com/chilipeppr/seria...serial-port-json-server-1.92_linux_arm.tar.gz
Then I extracted the files with the following command:
tar -xzvf serial-port-json-server-1.92_linux_arm.tar.gz
Then created a new text file with:
sudo pico /etc/init.d/cnc
and entered in the following
#! /bin/sh
# /etc/init.d/cnc
echo "Starting cnc"
/home/pi/serial-port-json-server-1.92_linux_arm/serial-port-json-server -re$
exit 0
then Ctrl o to save then Ctrl x to exit
To make it executable I typed:
sudo chmod +x /etc/init.d/cnc
Then:
sudo update-rc.d cnc defaults
Restarted the Pi with with sudo shutdown -r now and checked to see if the server shows up in Chilipeppr. Finally I used the graphical interface on the pi to change it to default to login to the CLI (Command Line Interface) and not log into the Pi account automatically just to reduce the overhead running on the Pi
The following websites were a big help:
Raspberry Pi • View topic - Raspberry PI CNC controlling TinyG
Raspberry Pi Config - Adventures in Printrbot CNC
Picture of the Pi on the left and the TinyG on the right:
6/15/16
Started the CAD work and laser cut a prototype out of cardboard for my control box. The final version will be laser cut out of acrylic.
The sides of the box will be 20x80 black v-channel to match the OX and the top will be another sheet of lexan.
6/19/16
Clamped all of the gantry extrusions together then I milled off each end to make them all exactly the same length.
6/20/16
Hand tapped the 20 holes in the gantry extrusions. This guide was a big help: M5 Tapping Guide for MakerSlide by scottmayson
7/20/16
I've been busy working on this project, here's where I'm at right now:
Wires have all been soldered, I used the 1/4" Flexo wire covers, heat shrink tubing, and 16mm aircraft connectors:
Control box is almost complete. I lasercut the faceplate on a K40 Chinese laser. Designed the layout myself:
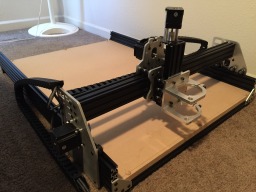
Basic OX build is complete:
I wanted to make sure everything worked without making a mess so I used Fusion 360 to draw a pen holder that mounts in a 1/4" collet on a router and 3D printed it.
CNC Router Mounted Pen Holder by mnelson78
She works:
Added a Z max limit switch:
3D printed limit switch mount I created can be found at: Ox Z max limit switch mount by mnelson78
7/28/16
I got the touch plate working today. I paid around $5 for it off ebay, but took a month to arrive. Added a longer cord to it and an aircraft connector to attach it to the CNC control box. I wasn't sure if it would work since all my other limit switches are NC where this is normally open (NO). Eventually found where the touch plate code works differently, and looks for a change of state, so NO changing to closed, or NC changing to open.
I also got the homing working and entered in the soft limits:
8/4/2016
Used the router hand held to create a t-track system. Works with 1/4"x20 bolts. I need to pickup some shorter bolts and cut some lower profile clamps, but I think it is going to work well.
8/7/16
Laser cut some .46" acrylic to make a dust boot. I used "Report Covers" from Walmart for the flexible sides, two layers thick. I purchased the .5" aluminum rod off amazon for $5.
![[IMG]](proxy.php?image=http%3A%2F%2Fi1201.photobucket.com%2Falbums%2Fbb347%2Fmyphotobucketpictures1%2FOX%2Fdustboot_zpsejwcqmi2.jpg&hash=3c6f942938dc5440157b9307f31731be)
Matt's Ox
Build in 'Cartesian Style CNC' published by Matt Nelson, Aug 8, 2016.
I'm building an OX CNC router. It will be the larger size of 750x 1000mm. This should give me a working area of about 22"x30".
-
-
Build Author Matt Nelson, Find all builds by Matt Nelson
-
- Loading...
-
Build Details
- Build License:
-
- CC - Attribution - CC BY
![[IMG]](proxy.php?image=http%3A%2F%2Fi1201.photobucket.com%2Falbums%2Fbb347%2Fmyphotobucketpictures1%2FOX%2Foriginalplates_zps68cvcvkd.jpg&hash=c8604c2834f8b6be951fb0704f8313bb)
![[IMG]](proxy.php?image=http%3A%2F%2Fi1201.photobucket.com%2Falbums%2Fbb347%2Fmyphotobucketpictures1%2FOX%2Fsandedplates_zpsqzisylup.jpg&hash=c479fd8b3db67a8394a7af51ab354832)
![[IMG]](proxy.php?image=http%3A%2F%2Fi1201.photobucket.com%2Falbums%2Fbb347%2Fmyphotobucketpictures1%2FOX%2FIMG_6036_zpspztwp7md.jpg&hash=d74d4d848541254c18c9f47c1d3df48a)
![[IMG]](proxy.php?image=http%3A%2F%2Fi1201.photobucket.com%2Falbums%2Fbb347%2Fmyphotobucketpictures1%2FOX%2Frouter_zpsgwlewmud.jpg&hash=2a1c1d7da8403b9fcac2aa3b3be48e87)
![[IMG]](proxy.php?image=http%3A%2F%2Fi1201.photobucket.com%2Falbums%2Fbb347%2Fmyphotobucketpictures1%2FOX%2Fz%2520carriage_zpssk4dxqia.jpg&hash=26961aa354945da291ef5b2956fc0334)
![[IMG]](proxy.php?image=http%3A%2F%2Fi1201.photobucket.com%2Falbums%2Fbb347%2Fmyphotobucketpictures1%2FOX%2Felectronics_zps5zrh8eqe.jpg&hash=4b4f2e47b1392bdaa4dffc2d2d34b68d)
![[IMG]](proxy.php?image=http%3A%2F%2Fi1201.photobucket.com%2Falbums%2Fbb347%2Fmyphotobucketpictures1%2FOX%2Fcontrol%2520box%2520prototype_zpsd9cnir5a.jpg&hash=e378c19ae678f70ed6964cf374cee581)
![[IMG]](proxy.php?image=http%3A%2F%2Fi1201.photobucket.com%2Falbums%2Fbb347%2Fmyphotobucketpictures1%2FOX%2FM5%2520tap%2520guide_zpsz3sfh8bz.jpg&hash=c3423097318c1dc6860a93b54ec79f0b)
![[IMG]](proxy.php?image=http%3A%2F%2Fi1201.photobucket.com%2Falbums%2Fbb347%2Fmyphotobucketpictures1%2FOX%2Fcables_zpsxa8x4hpn.jpg&hash=0011dacca0c39d0a3484b07a6cc0fe01)
![[IMG]](proxy.php?image=http%3A%2F%2Fi1201.photobucket.com%2Falbums%2Fbb347%2Fmyphotobucketpictures1%2FOX%2FIMG_6649_zpsqlzvjmqd.jpg&hash=1eb4abb781b78a070dbe9411f30bc7bf)
![[IMG]](proxy.php?image=http%3A%2F%2Fi1201.photobucket.com%2Falbums%2Fbb347%2Fmyphotobucketpictures1%2FOX%2FIMG_6721_zpsq8h1arti.jpg&hash=bdc20a85a7e82abba7ba999216b77a98)
![[IMG]](proxy.php?image=http%3A%2F%2Fi1201.photobucket.com%2Falbums%2Fbb347%2Fmyphotobucketpictures1%2FOX%2Fgantry_zps0bojug6h.jpg&hash=09214e994440fa304894ea3a3f9bb757)
![[IMG]](proxy.php?image=http%3A%2F%2Fi1201.photobucket.com%2Falbums%2Fbb347%2Fmyphotobucketpictures1%2FOX%2Fox_zpsdkyj61mx.jpg&hash=8635f690ea784dfd408cf1ee46ae255a)
![[IMG]](proxy.php?image=http%3A%2F%2Fi1201.photobucket.com%2Falbums%2Fbb347%2Fmyphotobucketpictures1%2FOX%2Fpenholder_zpsjcoyxnqn.jpg&hash=f36014b80662fbc1883a26495a6c1601)
![[IMG]](proxy.php?image=http%3A%2F%2Fi1201.photobucket.com%2Falbums%2Fbb347%2Fmyphotobucketpictures1%2FOX%2Fzmax1_zps6gtllivj.jpg&hash=56a4d89d7e31a7635483b5a3b18dfc54)
![[IMG]](proxy.php?image=http%3A%2F%2Fi1201.photobucket.com%2Falbums%2Fbb347%2Fmyphotobucketpictures1%2FOX%2Fttrack_zpses2valbu.jpg&hash=d201aff97f9bd071dfb7df6af98ea240)