
I have too many projects going at once
On top of building my C-Beam Machine (almost finished) and my LCD based resin printer (in progress), I've decided that my poor little QUBD Two-Up was just not cutting the mustard any more. It's too flimsy (although I did make changes to considerably improve that situation), too small, too inconsistent, and too slow. It was a great learning experience and was a good enough experience that it made me want to do more with 3D printers.
At first, I thought about making a C-Bot or one of the derivatives (the D-Bot was the last one I was contemplating), but I was at the mercy of my poor little 3D printer. While it was up to the job with PLA, I could never get good results from ABS. I didn't want to rely on my 3D printer to make... a 3D printer. So I switched gears.
After going through the basic assembly of the C-Beam Machine, I really liked the smoothness of the C-Beam linear stages. I also like the fact that backlash could be dialed out almost entirely with no worry of belt stretch. I did realize that the lead screw wouldn't give me a lot of speed, but part of me prefered the accuracy and repeatability of the lead screw. The belt reduction plate that was briefly available gave me an idea though.
The original idea behind the belt reduction plate was to increase the available torque, and double the resolution. That by itself would have pointed me in the wrong direction, but what if you swapped the pulleys? Now you would have a 1:2 ratio (double the speed, half the torque) instead of the standard 2:1. 1:2 would get me the speed I want while still retaining plenty of accuracy. Openbuilds doesn't have the two pulleys with the bore size that I would need, but other places do. It's a shame though the plates have temporarily been removed from the site. Hopefully it's to update them with the suggestions that I had made to make them more flexible (ability to mount the motors in front or behind the C-Beam, etc...)
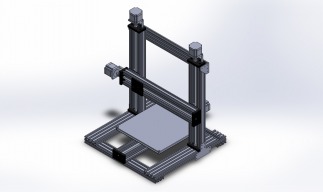
The major point behind this build was to have this just bolt together with minimal custom parts, and no cutting if possible. As it stands right now, the only custom parts are for the extruder mount (still keeping this direct drive), and the bed mount.
All linear stages will be 500mm units with NEMA 23 motors (overkill, I know). All V-Slot rails will also be 500mm. Linear stages will be two for the Z, one for the X (ultimately with a 1:2 belt drive), and one for the Y (moving table, also with a 1:2 belt drive). All of the mechanicals will be Openbuilds parts where possible. The only structural parts that won't be will be some T-brackets and a 45 degree stiffener extrusion from Misumi, which will stiffen the Z-axis. They have lots of parts that match the V-Slot sizes that fill in some of the holes in the Openbuilds product offerings.
The extruder will be my existing Bulldog XL (which has worked great), with an E3D Lite v6 hanging underneath it.
Heated bed will be a 12"x12" sheet of 1/4" thick MIC-6 cast tooling plate. A 300x300mm 750W 120vAC silicone heating pad will doing the heating duties with it being connected to the controller via an SSR.
All in all, this setup will get me a 12"x12"x12" build area with ease, and speeds that I can be happy with.
I'm still working on finishing up the basic CAD model and will post pictures as soon as possible. I was just too impatient and wanted to get the build thread up ASAP.
All parts are on order and will be showing up between today, and two weeks from now (heater mat is coming from China, but DHL).
I know there are many other ways I could have built a printer to meet the goals I set for myself, but you don't see many lead screw printers, and I wanted to see how it worked. It's entirely possible that there is a very good reasonThis seemed a decent way to go though for my "just bolt it together" mantra, and it heavily supports Openbuilds, so that's a plus.
Anyway, more to come.
My C-Beam 3D Printer
Build in 'Cartesian Style Bots' published by evilc66, Jul 29, 2016.
Larger format FDM printer using C-Beam linear stages
-
-
Build Author evilc66, Find all builds by evilc66
-
- Loading...
-
Build Details
- Build License:
-
- CC - Attribution - CC BY
Reason for this Build
Needed a bigger, faster, more solid 3D printer that could be bolted together with minimal fabrication