
(Click on photos to view full size)
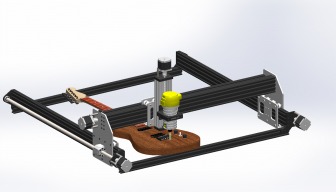
I've been designing this all winter, from the ground up using the solidworks parts library. Lots was useless but much saved me time and I had to design my own end mounts and plates to accommodate the ballscrews. Gathered parts from ebay and the openbuilds store, and was able to keep the whole thing under 1400$ USD! Its amazing. Aluminum is 6061 from a local supply, costing me only 30$ for 4 plates that are 1/4x10x12 or so. Will mill these later when I have the beams and motors to confirm spacing's.

![[IMG]](proxy.php?image=https%3A%2F%2Fphotos.smugmug.com%2FJahn-ReColours%2FJahnyo%2Fn-2fgM7v%2Fi-vWB3PLk%2F0%2FX2%2Fi-vWB3PLk-X2.jpg&hash=f9872f918bc08bc95f12360b267d6ec0)
May 2016
Ballscrews, housings, cables, and couplers ordered and custom made for me from a factory in china. All 3 screws were about 180$ shipped via fedex. Came in 4 days.

Wheels bought from a small company in Canada who had bought them bulk. Got 30 extreme wheel kits for 4.10 a piece compared to 9$ on the OB store. Nut housing were only 7$ a pop on ebay compared to 24$ each from the USA.

June 2016
Openbuilds parts ordered for fathers day, saving about 10$ on rails and not much else hahah. C beam Z axis will be used for now. Might swap to a ballscrew one if this doesnt work (but should!)
I will be mounting it backwards, so the gantry plate in it moves the router and the rail is fixed 3" above my board.
June 27th
Parts arrived. Lots of bubble wrap to fill that 8x8 box up! I guess they dont do 6x6 in the length required.

Everything unpacked and Z axis kit assembled.....Just my luck, the coupler they sent me is the wrong size. Sent an email to the store, hopefully we get it sorted out ASAP;
Now we wait for the eccentrics from europe and me to make the gantry plates (after I finish the design and make sure the holes are properly spaced)
July 2016
7th of July: New coupler and 250mm acme rod received, as well as some 10mm m5's I had asked for (OB was so kind to send it for free as a part of the exchange) and rebuilt the axis. All works well now.
8th July - Plates milled by my friend Sean Coogan. If anyone needs alu work, please go to him. The least I can do is send more work his way.
(The forum is being funky so I have to link you, sorry)
Video:
Finished pics:
Finished plates. Sadly, some of the holes he made were under sized so it added about 2 hours of work to ream them out to fit everything. Aluminum is a "soft" metal but **** is it hard compared to wood! I ruined a metal/wood bit or to in the process.
![[IMG]](proxy.php?image=https%3A%2F%2Fphotos.smugmug.com%2FJahn-ReColours%2FJahnyo%2Fn-2fgM7v%2Fi-RF96PZz%2F0%2FX3%2Fi-RF96PZz-X3.jpg&hash=6b8502ef5cc94932d1ab7e030d76124d)
Made the work table from 2x4s and deck screws, all cut by hand to offset how much power the cnc will use
![[IMG]](proxy.php?image=https%3A%2F%2Fphotos.smugmug.com%2FJahn-ReColours%2FJahnyo%2Fn-2fgM7v%2Fi-jZB2WZc%2F0%2FX3%2Fi-jZB2WZc-X3.jpg&hash=4fc3242b33e1ebad131eda62a99acc3d)
Tapping with oil and a drill. Makes quick work of it. Set the clutch to 7, drill until it chokes then back out and go again. Most holes only took 2 passes. TIP: PUT OIL IN THE HOLE, NOT ON TOP OF IT. PUTTING IT IN THE TAP'S FLUTES ALSO HELPS
![[IMG]](proxy.php?image=https%3A%2F%2Fphotos.smugmug.com%2FJahn-ReColours%2FJahnyo%2Fn-2fgM7v%2Fi-KvhQnV3%2F0%2FX3%2Fi-KvhQnV3-X3.jpg&hash=64c8b659220b90117c4d58fc1ab4482b)
Gantry assembled after day 2. Weighs about 25 lbs
![[IMG]](proxy.php?image=https%3A%2F%2Fphotos.smugmug.com%2FJahn-ReColours%2FJahnyo%2Fn-2fgM7v%2Fi-SjNVQdb%2F0%2FX3%2Fi-SjNVQdb-X3.jpg&hash=a9ecc41be35b5ef59d3265a5e226cd14)
Close up of my logo on the reinforcement plates:
![[IMG]](proxy.php?image=https%3A%2F%2Fphotos.smugmug.com%2FJahn-ReColours%2FJahnyo%2Fn-2fgM7v%2Fi-mfVvSGH%2F0%2FX3%2Fi-mfVvSGH-X3.jpg&hash=810cb55fefe3bc2f19d6c443a68e190d)
Machine framed in. You can see I used 2 old doors as my table top. Light, sturdy, and they stay flat. It sure beats using 1.5" of MDF! You can also see the power switch plate I made as a test cut
![[IMG]](proxy.php?image=https%3A%2F%2Fphotos.smugmug.com%2FJahn-ReColours%2FJahnyo%2Fn-2fgM7v%2Fi-PJC8h75%2F0%2FX3%2Fi-PJC8h75-X3.jpg&hash=da525ab2ac648a5198edbd1fcd1bb8fb)
Close up of wire management. I made the holes 2mm bigger now, it's a tight fight with the braiding into 1/4".
![[IMG]](proxy.php?image=https%3A%2F%2Fphotos.smugmug.com%2FJahn-ReColours%2FJahnyo%2Fn-2fgM7v%2Fi-5VNGSDd%2F0%2FX3%2Fi-5VNGSDd-X3.jpg&hash=8cb4ecdbb83471e8c78f9e7d8f8e0408)
AUGUST 2016
You can see the 1.5" spoiler, as well as the T tracks installed. I use that pressboard for when I mill metals (alu doesnt work right now, too much Z flex and bad bit choice. Waiting for single flutes!)
![[IMG]](proxy.php?image=https%3A%2F%2Fphotos.smugmug.com%2FJahn-ReColours%2FJahnyo%2Fn-2fgM7v%2Fi-MskB6nZ%2F0%2FX3%2Fi-MskB6nZ-X3.jpg&hash=a402cbb18f015eec7b4ca8a947e1daf2)
Controller is set up with XPadder.
Close up of screws and how I simply mount my X axis limit switch.
![[IMG]](proxy.php?image=https%3A%2F%2Fphotos.smugmug.com%2FJahn-ReColours%2FJahnyo%2Fn-2fgM7v%2Fi-Rd9spbw%2F0%2FX3%2Fi-Rd9spbw-X3.jpg&hash=911036cc53783ec9f8c8177150ca8e84)
Overview with safety shield, milling a guitar body in 35 minutes. I should be able to bring it down to 20 after refining.
![[IMG]](proxy.php?image=https%3A%2F%2Fphotos.smugmug.com%2FJahn-ReColours%2FJahnyo%2Fn-2fgM7v%2Fi-P8RMMNG%2F0%2FX3%2Fi-P8RMMNG-X3.jpg&hash=6ad0bd7b48bce4b71461458b5de659f4)
Temp. dust shoe. Making one with magnets + acrylic once I get to design it. The shoe gets in the way of the clip when probing.
![[IMG]](proxy.php?image=https%3A%2F%2Fphotos.smugmug.com%2FJahn-ReColours%2FJahnyo%2Fn-2fgM7v%2Fi-sfqPTXx%2F0%2FX3%2Fi-sfqPTXx-X3.jpg&hash=9afb43169315876636bfde9aab3e2647)
New Z axis plate! This REALLY stiffened up the Z axis. The bit broke 1/2 way through the profile thanks to the existing slop, but now I atleast have it and can cut a new one once my new 0 flute arrives. I'll make the new long 40mm longer to add some more strength.
![[IMG]](proxy.php?image=https%3A%2F%2Flh4.googleusercontent.com%2FD8UzBnpAcku8YuuSRyIJFYg5wVoMo1NMWYMrcMacCPqnl05Ee8gSkrodG8zo_pIpthvPxkba%3Dw920-h1227&hash=7598d5ca068b0ca99d9cec53910ec6bd)
INSANE Cutting depth thanks to the new mod. 140ipm, 0.7 DOC, and 40ipm plunge. (3500mm, 18mm, and 1000)
Instagram video by Julius Jahn • Aug 18, 2016 at 10:51pm UTC
New design for the dust shoe. Waiting for the alu bit to cut this out (Router bits) . Held on with magnets and doesn't interfere with max cut depth.
![[IMG]](proxy.php?image=http%3A%2F%2Fi.imgur.com%2F6YinsHZ.jpg&hash=a2755a9d563dba9f7cf818b617fce2f8)
OX Balls - 1605 Ballscrew Powered 1000mmx1000mmm OX derivative
Build in 'Cartesian Style CNC' published by Julius, Aug 20, 2016.
1000x1000mm Ballscrew driven OX Derivative. Dewalt 611 spindle and TB6600 Drivers.
-
-
Build Author Julius, Find all builds by Julius
-
- Loading...
-
Build Details
- Build License:
-
- CC - Attribution - CC BY
Reason for this Build
CUT WOOD QUICKER AND CLEAN AND FAST AND ACCURATE
![[IMG]](proxy.php?image=http%3A%2F%2Fi.imgur.com%2F2NuG3De.jpg&hash=98e040cce93638f7c977a3bb2defc2a9)
