20 juillet 2017 : test in progress
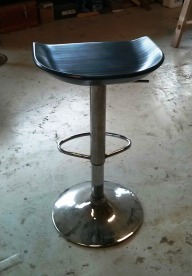
This is a variation of the bar stool.
Slices of coloured MDF cut by the OX, then glued together and hand finished.
the next step will be to minimize as much as possible the hand work. To have all the slices 3D milled on both faces.


The finish is ugly ("accident with an aceton bottle...") but this was not the purpose of the test.
14 juillet 2017 : up and running.
I've had a ot of troubles dring my first cuts, but this was mainly due to bits choice and cuting speeds.
I'll maybe someday think to change belts for lead screws, but at the time being I'm happy with my Ox.
28 avril 2017 : Control box OK
I finalized the Control box for the OX. It holds the controller PCB, the power supply, the emergency stop, a Solid State Relay (to power the spindle), a fan (for cooling) + all the connectors.
V1 made out of plywood + plastic plates (front and rear) milled on the OX.
There are air intakes under the PS, SSR and PCB.
13 avril 2017 : OX up and running.
I managed to mill the aluminium plate (5 mm) with the first version of my build (3d printed plates). It was not easy at all... I'm a newbie in metal machining...
I do not recommended 3D printed plates for a final version. Not accurate enough... I left my Ox behind a window on a sunny day, and the plates just warped !
But my Ox is up and working fine. I still have to make precise measurements to check squarness, but so far the first tests make me think that it'll be ok for me (I'm a carpenter).
I redesigned taller plates to have more Z.
The next step is to add a dust collection system (A MUST have) and to build a cabinet to hold the Ox, the controller, the vaccum system and all the tools.
So far, so good.
29 mars 2017 : limit switches operating.
I finalized the cabling an mouting of the limit switches.
I used a DB15 connector for the switches

although TinyG offfers a + and a - connection for each axe, I decided to use 2 serial mounted switches for each axe. Only to save cabling. It works fine, but there are some side effects in some situations when homing (G28.2 in tinyG)
I made some tests with a pencil taped to the Z axis. Went fine, although i found out that the machine wasn't squared. I still have to fix it.
If received the router (+ collar + bits + support) today (1050 W). So first full test hopefully this week-end...
22 mars 2017 : it's running.
TinyG controller up and runnig. Still miss the router and limit switches. Ordered but not yet received.
First tests OK.
Still a lot of work to do on cabling and enclosure, but the emergency stop is working fine.

2 mars 2017 : Finished 1st mechanical assembly.
I finalized the first assembly ogf the router. 3D printed parts are not as precise as they should be but I feel thaht this will be enough to allow me to mill the final part.
Still missing the electronic.
20 février 2017 : OpenBuilds order received.
I just received my order today. Screws, motors, plates, etc... Very well packed, nothing missing.
One bad surprise : the Custom charges (48 €) not mentionned when I ordered.
Also received the filament so I will start printing the Y gantry plates.
Still waiting for the V-Slot rails (ordered in europe...)
19 février 2017 : Y gantry plates
As my 3D printer is too small I redesigned a two parts Y gantry plate from the original file so that they can be printed on a 200 mm x 200 mm 3D printer.
It is intended to be glued and has some reinforcement pieces to strengthen the join. The STL file includes some chamfers, rounded corners and gaps (a few 1/10th of a milimeter) to allow room for the glue.
This was designed as a temporary solution. I expect this plate to be strong enough to allow the first runs and then to be strong enough to mill the final plates from aluminium or another material.
The reinforcement pieces should not interfere with the screws nor with the motor.
As I'm currently out of filament I did not print these yet but I will within the next weeks.

Should anyone be interrested, I can share the STL files. The other plate should just be mirrored within your prefered slicer.
9 Février 2017 : Controller choice.
I've spent hours searching the internet. I'm looking for a controller that work with 4 axis and that allows homing AND limit switches. I will later use the fourth axis with a rotary device so I don't want to use the "Clone" option for the two Y motors.
Being a professional carpenter, I can't imagine an automated machine that would be unable to stop by itself if it has reached it's physical limts!
On the OX there are 2 motors on the Y axis. Although one can wire two motors on the same controller it it not recommended and I won't do it.
So I intend to use a tinyG board, with an additional stepper motor controller.
If anyone has good advices about the additional motor to use (brand, model and source... I'm in France), I will be interested.
From what I've read, the TinyG issues 3.3 V signals, so this has to be taken in consideration, I've also read a lot about pulse width (duration in ms) that can prevent some motors to run properly...
I will built a separate enclousre box for the controller. Because I also intend to use a software controlled variable speed spindle in the final version.
I will probably end up with to power supplies + a fan + connectors. And I don't want to have this mass attached to the gantry. I might be wrong, but I think this would have a real negative effect on acceleration and deceleration.
Looking to hear from you...
Février 2017: Lancement du projet.
Je me suis finalement lancé ce WE. J'ai commandé les profilés V-slot en france et le reste de la quincaillerie chez OpenBuild poour une dimension de x=700, y=1000, z=300. Pour le z "utile" je verrai quand le modle de base fonctionnera. Je voudrais ajouter un 4ème axe et donc j'aurai besoin d'une bonne hauteur en Z.
Si tout fonctionne, il sera temps d'usiner de nouveau support pour augmenter le Z utile.
J'ai beaucoup apprécié la feuille excel OXCalculator, qui m'a permis de lister très facilement les pièces à commander. Comme j'habite en France et que les frais de port sont significatifs, pour les "petites" pièces j'en ai commandé plus que nécessaire.
J'imagine que je ne suis pas le seul à me poser la question concernant les plaques en alu de 6 mm usinées...
J'ai chois d'imprimer en 3D (PLA) les deux de l'axe des X et de fabriquer "à la main" les deux de l'axe des Y qui sont trop grandes pour mon imprimante 3D (Dagoma Discoeasy).
Je suis parti des fichiers stl fournis. Buse 0,4 mm. Layer 0,2 mm. 5 shells. 5 Couches top et bottom. Infill : Full honeycomb, 70%.

Quand l'OX sera fonctionnel, mon objectif est de refabriquer les deux pièces des X en alu et de remplacer celles imprimées en 3D. J'espère qu'elles seront assez solides pour tenir le temps de l'usinage.
OX CNC Router
Build in 'Cartesian Style CNC' published by Chefson, Jul 20, 2017.
Ca fait 2 ans que je rêve d'une Fraiseuse CNC. Ni trop grande ni trop petite, sans avoir le budget pour en acheter une toute faite. Je suis artisan menuisier ébéniste et j'ai finalement décidé de la construire. Le projet OX m'a séduit, alors je me lance.
-
-
Build Author Chefson, Find all builds by Chefson
-
- Loading...
-
Build Details
- Build License:
-
- CC - Attribution - CC BY
Reason for this Build
It's been 3 years since I wanted to have a cnc machine in the shop. Building it myself is much cheaper than buying it. But it also takes a LOT of more time to get....Inspired by
OX CNC router