
Plans
My plan is to stick fairly closely to spauda01's design. At least, I plan on making it the same dimensions, with the cantilevered z-axis, and with the 200x300 PCB bed. The hot end will be a E3D V6, and I'll probably move the BL-Touch over from my Prusa clone.
Cutting Metal
I cut the OpenBuilds v-slot aluminum extrusion with my chop saw using a cheap framing blade and lubricating with cutting oil. A couple of pieces had a bit of a burr, but nothing a deburring tool couldn't easily remove. It's hard to imagine a non-ferrous blade would do significantly better. Tapping the M5 screw holes went smoothly too. The recommended extrusion has holes sized correctly for an M5 tap so it's easy to keep everything straight.

Printing Parts
ABS or PETG are recommended, but my current system isn't ideal for either. A bunch of folks are having success with PLA, so I'm starting with that. I'll probably re-print spares for the structural parts out of another material when the machine is up and running. I have some parts coming from China, so I have a few weeks to get things printed.
For the most part, the printing on my prusa clone has gone smoothly. Then, I decided to let it run unattended for a couple hours and there were issues. I'm guessing that a stray bit of plastic caught the E3D's silicone sock and moved it so the remaining filament extruded inside it.

Assembly Hints
Getting the bearings, washers, and nuts in place on the right and left rear idlers was easier than I expected. Bent tweezers work well for setting the bearings and washers in place. The nut seems like it might be harder because it can side further back in the hole than it needs to go. I started by running a deburring tool around the edge of the pocket so the nut could slide in easily, then turned the assembly upside down and pushed the nut back until it was in the right place.

Bent tweezers are also a great tool to hold square nuts in place when inserting a screw from the top. Sliding the tweezers under the nut will force it up against the top of the channel. Otherwise it may be hard to pick up the thread or easy to cross-thread the nut.

While it's sometimes possible to get square nuts into the slot from the top without sliding them down from an open end, the tolerance is tight and some nuts just won't fit. Also, unless you are screwing directly up or down, holding the square nut in place is a pain. Having a handful of drop nuts is much less frustrating.
I tend to use obijuan's Ikea hook clone as a test print and just noticed that if you zip tie one to the cable bundle coming off the print head, it hooks over the rear bar of the printer talking some of weight off the print head while still sliding freely. I'm actually using a partial hook from a killed print with the unused end clipped off.

Electronics
In a departure from the "stock" D-bot, I'll be using a Smoothieboard for control and OpenBuilds' NEMA 17 steppers. While the machine would work with a clone RAMPS board and lower torque steppers, the Smoothieboard is very well designed and has a lot of room to grow if I decide to try new things. It takes up more space than the RAMPS board, so I mounted the power supply on the side using my 20x30 right angles. I have the Smoothieboard in a box, but I plan on remixing the lid. The stock lid would work, but I want to make something that is a little easier to change cables.

Modifications
Rather than printed spacers for the wheels, I switched to OpenBuilds 6mm aluminum spacers. Small inconsistencies in the plastic parts seemed to be causing some sticking here and there. The aluminum spacers worked better, but there was some binding--particularly if they were tight against the wheels. I used my lathe to take off a small amount if material on the side close to the wheel and that solved the problem.

I was having issues with the printed bowden extruder. To get it to feed the filament reliably I needed to use a stronger spring and make it fairly tight. That made it more difficult to undo and readjust when swapping filament. Instead, I installed a cheap all-metal left handed extruder.
I ended up with extra aluminum spacers and MR105ZZ bearings. They fit over the filament spool holder's M5 bolt and make that work smoothly.

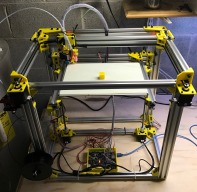
Rob's D-Bot Build
Build in 'H-Bot and Core XY' published by Rob Altenburg, Jun 5, 2017.
The plan is to make this a fairly stock D-Bot build. We'll see if mods start creeping in.
-
-
Build Author Rob Altenburg, Find all builds by Rob Altenburg
-
- Loading...
-
Build Details
- Build License:
-
- CC - Attribution - CC BY

