Version 2 (5/12) Files listed below pictures
There is an Assembly Manual online at
http://3dwrx.com/TrueUp/Kit-Manual2/index.html
It is for assembling a Kit, but also works for assembling a DIY.
This project is a Kit Version of the TrueUp Glide project. Although this model was designed specifically to make assembly easier from a kit, this model will also be easier for Built-It-Yourself too. Printed nylon bushings and oversized box panels have been eliminated in this model. This is a separate project mostly to separate the two discussion threads. The main reason for this version is to satisfy the many requests made for one by OpenBuilds members,especially from non-USA builders, who have problems finding hardware parts, and from potential builders, who do not have ready access to a 3d printer.
Building a printer with a truly squared frame is the default when using OpenBuilds aluminum extrusions. You actually have to purposefully design a flaw to assemble a frame that is not inherently squared on all three axes. Although this effect is readily apparent to anyone who's built a OpenBuilds frame, OpenBuilds has actually revolutionized the way 3D printers can be designed.
Instead of designing to minimize framing flaws inherent in legacy frame designs, designing with OpenBuilds becomes an exercise in leveraging rigidity and squareness, opening up new possibilities - the main one, completely eliminating the need for auto-leveling systems. An OpenBuilds frame starts out level on all three axes. The real design challenge then is to keep from screwing that up. Start level - stay level.
Auto-level systems do indeed produce level first layers. But the system has to achieve that level at the start of each print. That's because the amount of adjustment needed at the start of the current print is the very amount that the system was no longer level at the top of the previous print. Why does auto-level guarantee that the printer can not remain level? To achieve that level first layer, auto-level systems have to micro-adjust the two Z axis motors using microstepping.
Yet, we have all seen this warning:
That's right, microstepping was developed for smooth motion, not accuracy. The result, two motors can not be kept in sync if they move by microstep increments. As the two motors drift out of sync, the X axis drifts out of level with the bed after the first layer.
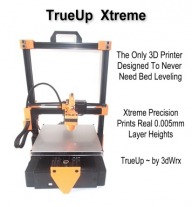
TrueUp eliminates this problem two ways. First of all, TrueUp uses only one Z axis motor, syncing the two Z screws and motor with a timing belt. That eliminates the drift between the two screws. Second, TrueUp gears the Z screws and Z motor so that one revolution of a 200 step motor will produce 1mm of lift. One full step of the motor therefore produces 0.005mm lift - every layer of the print. With TrueUp, you achieve level on the very first print, and still have the same level and resolution thousands of layers, indeed, thousands of print jobs later.
Also leveraging the fact that an OpenBuilds build plate will be true with the rest of the frame, TrueUp eliminates plate leveling problems. No PCB hot bed here, TrueUp uses an aluminum heat bed. When micro-adjusting a corner with a PCB bed, the bed tends to bend, suggesting 9, or even 90, point auto-leveling. With an aluminum bed, adjusting one corner cause a change in the spring tension on the two adjacent corners while the bed itself remains flat.
Kit Assembly Manual
Assembly TrueUp Kit Index
May 5/12>> Kit Assembly Manual
Assembly TrueUp Kit Index
SKP FILES (7mb)
http://3dwrx.com/TrueUp/kit-skp.zip
May 5/12>> SKP FILES (7mb)
http://3dwrx.com/TrueUp/Kit-Manual2/SKP-parts.zip
SKP ASSEMBLED (12mb)
http://3dwrx.com/TrueUp/Kit-Manual2/SKP-ASSEMBLED.zip
May 5/12>> SKP ASSEMBLED (12mb)
http://3dwrx.com/TrueUp/kit2-assembled.zip
STL FILES (3mb)
http://3dwrx.com/TrueUp/kit-stl.zip
5/12>> STL FILES (3mb)
http://3dwrx.com/TrueUp/Kit-Manual2/STL-parts.zip
BOM
http://3dwrx.com/TrueUp/TrueUp-KIT-BOM .pdf
DAE Files (2mb)
http://3dwrx.com/TrueUp/kit-dae.zip
TrueUp Kit Version
Build in 'Cartesian Style Bots' published by Keith Davis, Aug 10, 2017.
A Cartesian printer using bushings for the Z axis instead of wheels or linear bearings. The design also synchronizes two Z axis screws with a timing belt for a level lift. The ratio of the drive pulley and Z axis pulleys produce .005 lift per full step on a 200 step motor, eliminating layer resolution "drift" caused by microstepping.
-
-
-
- Build Progress:
-
- Build Complete!
You, Lameduck60, Timmygray and 18 others like this. -
-
Build Author Keith Davis, Find all builds by Keith Davis
-
- Loading...
-
Build Details
- Build License:
-
- CC - Attribution NonCommercial - Share Alike - CC BY NC SA
Reason for this Build
An easy to assemble Kit version of the TrueUp GlideInspired by
Prusa MK2, TrueUp Glide, Onez


![[IMG]](proxy.php?image=http%3A%2F%2F3dwrx.com%2FTrueUp%2Fad1.jpg&hash=e94ca197f97322de92774aa19c0a2a1f)
![[IMG]](proxy.php?image=http%3A%2F%2F3dwrx.com%2Fpics%2Fprusa.jpg&hash=591f71d2045e90f38057790b199d6758)
![[IMG]](proxy.php?image=http%3A%2F%2F3dwrx.com%2Fpics%2Fkit%2Fframe.jpg&hash=223f465a7815202fed2c69f8101f5c7e)
![[IMG]](proxy.php?image=http%3A%2F%2F3dwrx.com%2Fpics%2Fkit%2Ffront.jpg&hash=d75fc0d2250d802101794f685ac8af06)
![[IMG]](proxy.php?image=http%3A%2F%2F3dwrx.com%2Fpics%2Fkit%2Fleft.jpg&hash=c307a0366e3a6e5fb6d6959a6158e031)
![[IMG]](proxy.php?image=http%3A%2F%2F3dwrx.com%2Fpics%2Fkit%2Fright.jpg&hash=c33ca7f899d69398c47b5636cbcf225b)
![[IMG]](proxy.php?image=http%3A%2F%2F3dwrx.com%2Fpics%2Fkit%2Fback.jpg&hash=5872f26b987499acb5c9ac36f1778c95)
![[IMG]](proxy.php?image=http%3A%2F%2F3dwrx.com%2Fpics%2Fkit%2Fends.jpg&hash=7041d1afc3e8eba1af42dff047989bff)
![[IMG]](proxy.php?image=http%3A%2F%2F3dwrx.com%2Fpics%2Fkit%2Finsert.jpg&hash=dfcc9fe1e0556c585820741bc405899b)
![[IMG]](proxy.php?image=http%3A%2F%2F3dwrx.com%2Fpics%2Fkit%2Fextruder.jpg&hash=223b45d6b6b945fe69f40a7f614ddd37)
![[IMG]](proxy.php?image=http%3A%2F%2F3dwrx.com%2Fpics%2Fkit%2Fdetail1.jpg&hash=20c876dc2303763364a7a1814dc95364)