
This LZ version (Linear Z) of TrueUp uses linear rods and bearings for the Z axis instead of the nylon glides used in earlier versions. Although we have sold more that two dozen assembled TrueUps with nylon glides which have never presented a problem, kit builders report trouble getting the correct balance of forces between the glides and extrusions. The linear rods and bearings are super easy to install correctly and provide just as rugged construction and true movement, albeit at an added expense.
The rest of the LZ printer is close to the same construction as the Kit version. The main difference is in the printed plates for the MKS Gen controller box and PSU hanger, they are designed to be printed on a 200x300mm bed, or to be laser cut acrylic.
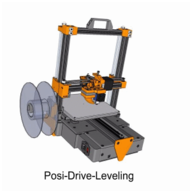
The fundamental TrueUp concept requires two Z axis screws being run by one Nema 17 Z axis motor synchronized by a timing belt. This guarantees that both screws will remain in sync, eliminating any drift causing the X axis to become unlevel with the bed. Once a TrueUp has been initially setup level, it remains level, every layer of every print job. This completely eliminates any need for an auto-leveling system, which only levels the first layer to an unlevel bed, then guarantees that every layer after that will be unlevel with that first layer. In addition, the pulley sizes between the Z motor and Z screws creates a gear reduction delivering 0.005mm layer resolution using only full step increments, eliminating inaccurate micro-stepping.
The TrueUp uses OpenBuilds extrusions bolted directly to each other without connector hardware, guaranteeing a square and ridged frame. Use of Openbuilds wheels for the X and Y axis guarantees near silent operation of the printer.
The linear rods were placed behind the Z screws with the X axis attached in front of the screws. Although this makes for a compact design, the main consideration was to to strengthen the design by positioning the Z screw/nut as the fulcrum between the X axis and the linear bearing guide.
The STL Zip is
http://3dwrx.com/LZ/STL.zip
The Sketchup Assembled file is
http://3dwrx.com/LZ/assembled-lz.skp
The online Assembly Manual is at
http://3dwrx.com/LZ/Manual/
If you want to upgrade a TrueUp Kit to use the linear bearings/rods, the STL for just that is
http://3dwrx.com/LZ/Z-axis.zip
You will also need 45mm long 8m linear bearings and 15" x 8mm linear rods.
There is no Master BOM yet (it will be posted here when ready).
There is a Step BOM at the top of each Step page in the Assembly Manual
Sold another fully assembled TrueUp LZ 4/2/2018. Here's three pics of the first print, the calibration object. Perfect first print, it will repeat this perfect print 1000 prints from now with no adjustments al;ong the way.
![[IMG]](proxy.php?image=http%3A%2F%2F3dwrx.com%2Fopenbuilds%2FDSCN0212.JPG&hash=b7952cf43e0f12cd0163460e8f8518ce)
![[IMG]](proxy.php?image=http%3A%2F%2F3dwrx.com%2FLZ%2Fimgs%2Fright.jpg&hash=4cbd9c11b6b8eb10b2a1d2c57c185d94)
TrueUp LZ
Build in 'Cartesian Style Bots' published by Keith Davis, Apr 6, 2018.
A version of TrueUp using linear bearings/rods for the Z axis. This required enough modification to make a separate OpenBuilds project to avoid confusion for DIYers.
-
-
Build Author Keith Davis, Find all builds by Keith Davis
-
- Loading...
-
Build Details
- Build License:
-
- CC - Attribution NonCommercial - Share Alike - CC BY NC SA
Reason for this Build
To offer an easier construction methodInspired by
TrueUp Kit
![[IMG]](proxy.php?image=http%3A%2F%2F3dwrx.com%2Fopenbuilds%2FDSCN0210.JPG&hash=51944eed2609f88a4be5154e014117b1)
![[IMG]](proxy.php?image=http%3A%2F%2F3dwrx.com%2Fopenbuilds%2FDSCN0211.JPG&hash=d58d3f127fe0b3000bbbb19c0ffd1670)
![[IMG]](proxy.php?image=http%3A%2F%2F3dWrx.com%2FLZ%2Fimgs%2Fback3.jpg&hash=cd638db259a7dddec945c586814e9d12)
![[IMG]](proxy.php?image=http%3A%2F%2F3dwrx.com%2FLZ%2Fimgs%2Fbottom3.jpg&hash=2ba3ff0bbe8f6b1476a4f1ff2b2e2b57)
![[IMG]](proxy.php?image=http%3A%2F%2F3dwrx.com%2FLZ%2Fimgs%2Ffront3.jpg&hash=5bd09f4560fbe6778b151cf9923609fb)
![[IMG]](proxy.php?image=http%3A%2F%2F3dwrx.com%2FLZ%2Fimgs%2Fleft.jpg&hash=091f9035808744176ee14ba074dbc374)