Welcome to Our Community

Some features disabled for guests. Register Today.

Dragon too Plasma cutter Mods (MetalGuru idea)

Discussion in 'Laser Cutters' started by mytechno3d, Apr 26, 2017.
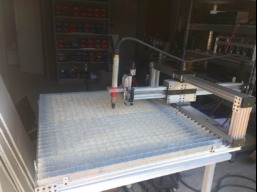
  1. mytechno3d

    mytechno3d Veteran
    Builder

    Joined:
    Dec 15, 2013
    Messages:
    108
    Likes Received:
    311
    mytechno3d published a new build:

    Read more about this build...
     
    stargeezer likes this.
  2. mytechno3d

    mytechno3d Veteran
    Builder

    Joined:
    Dec 15, 2013
    Messages:
    108
    Likes Received:
    311
    First move were done , i will upload some video in few days
     
  3. Simas Razinskas

    Builder

    Joined:
    Aug 5, 2017
    Messages:
    1
    Likes Received:
    0
    Hi, excellent build. Where can I find plasma cutters and how to pick one?
     
  4. Oz_Dave

    Oz_Dave New
    Builder

    Joined:
    Mar 18, 2017
    Messages:
    1
    Likes Received:
    0
    Hi,
    I have taken an interest in your build and think the idea is great. I have an under utilized plasma cutter and thought this would be great for some light fabrication.
    Have you got it finished and working?

    How are the feed rates with acme screws? I thought the rate needed for Plasma would be too fast for them.
    Would rack & pinion would be more suited to a plasma cutter. What are your thoughts.

    So many questions..
    regards
    Dave
     
  5. Gandes

    Gandes New
    Builder

    Joined:
    Oct 2, 2017
    Messages:
    5
    Likes Received:
    0
    Light fabrication need some better equipment but good luck and find the cheapest one
     
  6. ericoneill

    Builder

    Joined:
    Mar 6, 2018
    Messages:
    3
    Likes Received:
    0
    WERE DO I BUY THE PARTS TO BUILD THE TABLE SETUP
     
  7. mytechno3d

    mytechno3d Veteran
    Builder

    Joined:
    Dec 15, 2013
    Messages:
    108
    Likes Received:
    311
    Hello
    All parts came from www.vslot-europe.com
    This is project is still a work in progress ( i've to much work to do right know to go faster :( )
    If you need the specific plates to make this build , i can send you dxf files or cut them for you in aluminium 5mm for a good price .

    Regards
    Michael
     
  8. ericoneill

    Builder

    Joined:
    Mar 6, 2018
    Messages:
    3
    Likes Received:
    0
    Micheal if you could send us the file that be great and the sizse of the aluminium lengths and bearings needed I try build one the same thanks
     
  9. mytechno3d

    mytechno3d Veteran
    Builder

    Joined:
    Dec 15, 2013
    Messages:
    108
    Likes Received:
    311
    I have some time to spent , so i come back to this project .
    It's now alive ... it move :)
    I will try to make some plasma cutting this week .
     
  10. mytechno3d

    mytechno3d Veteran
    Builder

    Joined:
    Dec 15, 2013
    Messages:
    108
    Likes Received:
    311
    First cut was finaly done yesterday , all works fine at the first cut , i'm pretty pround of that :)
    This Dragon plasma cutting table is not so fast as my ox cnc plasma cutting table because i use leadscrew instead gt3 belt but its main advantage is to be easily transportable and to be able to put the steel sheets in place on 3 sides
    Max speed : 1.2m /mn
     
    Rick 2.0 and GrayUK like this.
  11. GrayUK

    GrayUK Openbuilds Team Elder
    Staff Member Moderator Builder

    Joined:
    May 5, 2014
    Messages:
    1,668
    Likes Received:
    627
  12. Bill Wilson

    Builder

    Joined:
    Dec 13, 2017
    Messages:
    1
    Likes Received:
    0
    @mytechno3d - You have put together a nice solution. I am going to try to duplicate it in my spare time. Did you share the .dxf files you mentioned earlier? If possible, I would like to have them them also...it will save me a lot of time to use already proven models! :)
     
  13. mytechno3d

    mytechno3d Veteran
    Builder

    Joined:
    Dec 15, 2013
    Messages:
    108
    Likes Received:
    311
    Hello
    I just uploaded the specific plates needed for this build .
    There is 2 plates for the floating head , 4 plates to build arch , 2 plates to build the X/Y system , all other plates are standard openbuilds plates .
    Just tell me if you need specific pictures .
    I also have solidworks files if needed .
     
    GrayUK likes this.
  14. Brandon Mathews

    Builder

    Joined:
    Oct 2, 2018
    Messages:
    1
    Likes Received:
    0
    Do you have a list of components used? I'm trying to make my shopping list! Also is there a reason for using the plates on both sides of the rails?

    Cheers
    Brandon
     
  15. mytechno3d

    mytechno3d Veteran
    Builder

    Joined:
    Dec 15, 2013
    Messages:
    108
    Likes Received:
    311
    Hello , the Bom is almost done , i just have to count all screws ... ( no the easyest thing to do ;-) )
    I think it should be done this afternoon ( Paris time )
     
  16. mytechno3d

    mytechno3d Veteran
    Builder

    Joined:
    Dec 15, 2013
    Messages:
    108
    Likes Received:
    311
    I uploaded BOM , it's still a BOM in progress because i am still counting all screws ... but screws apart it seems good .
    I also have to check the length of the 2060 rails .
     
  17. MTO

    MTO Well-Known
    Builder

    Joined:
    Dec 5, 2013
    Messages:
    35
    Likes Received:
    35
    would you mind posting more detail about the head? I'm not seeing how it works, beyond it being in two parts. From the video , you're obviously bottoming the z-axis, then backing off, but its not clear how it all goes together.
     
  18. mytechno3d

    mytechno3d Veteran
    Builder

    Joined:
    Dec 15, 2013
    Messages:
    108
    Likes Received:
    311
    Hello
    There is 2 parts for this floating head.
    One part is motorized with a nema 17 ( Z axis like on a CNC ) and the second part who handle the plasma torch .
    The second part is free to move .
    The probing is done with gcode ( post processor in fact ) , i ask to go down for 100mm , when the torch is on the metal sheet , the second part goes up until the probing switch is triggered .
    I know the offset between the switch and my torch , so i know that when the switch is hit , i have to go up for XX mm (9mm in my case ) and my Z zero is done.
    Excuse my poor english , i will post a video tomorrow to explain the process , i think it will be more clear .
     
  19. mytechno3d

    mytechno3d Veteran
    Builder

    Joined:
    Dec 15, 2013
    Messages:
    108
    Likes Received:
    311
    i think that BOM is now complete .
    Just let me know if you find some errors on it .
     
  20. mytechno3d

    mytechno3d Veteran
    Builder

    Joined:
    Dec 15, 2013
    Messages:
    108
    Likes Received:
    311
    If it can help , this is a solidworks picture of the floating head assembly zf1.png zf2.png
     
  21. Peter Van Der Walt

    Peter Van Der Walt OpenBuilds Team
    Staff Member Moderator Builder Resident Builder

    Joined:
    Mar 1, 2017
    Messages:
    13,675
    Likes Received:
    4,057
    Quick question if you don't mind.

    I have my floating head switch at the bottom, so I set zero after the initial height sense probe. But I see on your floating head the switch is at the top.
    Would there by any chance you can share your Height sensing macro gcode? Would love to take a look, and it also makes the build a little easier.

    If your using a Postprocessor, can you give me a snippet of the resulting gcode?
     
    #21 Peter Van Der Walt, Oct 31, 2018
    Last edited: Oct 31, 2018
  22. mytechno3d

    mytechno3d Veteran
    Builder

    Joined:
    Dec 15, 2013
    Messages:
    108
    Likes Received:
    311
    Hello
    Work is done by the postprocessor .
    Here is the resulting gcode :
    6.2mm is the switch position
    i try go down 150 mm (max ) until the probe switch is triggered
    i go up for 6.2mm and then i know that my z zero is correct , just on the metal sheet
    i do a G92 Z0.0.
    Code:
    ****** z zero****************
    N0100 G28.1 Z150.00 F800.0
    N0110 G92 Z0.0
    N0120 G00 Z6.2000
    N0130 G92 Z0.0
    N0140 G00 Z3.0000
    
    ***************************
    N0150 M03
    N0160 G04 P0.3
    
    If needed , this is my postprocessor ( sheetcam )
    ***************************
    --************************************************
    --*** Set these values up to suit your machine ***
    --************************************************
    --this is the distance between each torch reference in MILLIMETRES
    refDistance = 150
    --this is the reference feed rate in mm/min
    refFeed = 800
    --Put your switch offset value here in MILLIMETRES
    switchOffset = 6.2
    --Scriber X,Y,Z offsets in MILLIMETRES. Do not use inches here even if you want inch code
    --Use the special code 'nil' on the Z axis to disable it.
    --In that case no Z values will be output at all while scribing.
    --e.g scriberZ = nil
    scriberX = 110
    scriberY = 220
    scriberZ = 0
    --scriber axis. Leave this as nil if the scriber is fixed to the same axis as the torch
    --scriberAxis = "A"
    scriberAxis = nil
    --The cutter will slow down for corners and turn off THC below this radius
    slowRadius = 10
    --Minimum slow down speed.
    --This is a scale factor. For instance 0.5 = 50% of the current feed rate
    slowPercent = 0.4
    --THC on and off codes. Use nil if you don't want THC control e.g:
    -- thcOnCode = nil
    -- thcOffCode = nil
    --here is another example that use M667 and M666
    --thcOnCode = " M667"
    --thcOffCode = " M666"
    thcOnCode = nil
    thcOffCode = nil
    --************************************************
    --***           End of settings                ***
    --************************************************
    function OnAbout(event)
       ctrl = event:GetTextCtrl()
       ctrl:AppendText("plasma MP1000-THC post processor with engraver\n")
       ctrl:AppendText("\n")
       ctrl:AppendText("Modal G-codes and coordinates\n")
       ctrl:AppendText("Comments enclosed with ( and )\n")
       ctrl:AppendText("M03/M05 turn the torch on/off\n")
       ctrl:AppendText("M08/M09 turn the engraver on/off\n")
       ctrl:AppendText("Incremental IJ - set in mach2\n")
       ctrl:AppendText("The torch is referenced at cut start and every 500mm of movement thereafter\n")
       ctrl:AppendText("Designed for use with Mach3 and CandCNC MP1000-THC and Floating head Touch-n-Go\n")
       ctrl:AppendText("Post variables:\n")
       ctrl:AppendText("refDistance - set the distance between each reference\n")
       ctrl:AppendText("refFeed - set the feed rate when referencing\n")
       ctrl:AppendText("switchOffset - set your net switch offset amount \n")
       ctrl:AppendText("Scriber uses any tool number\n")
       ctrl:AppendText("slowRadius - slow down below this radius\n")
       ctrl:AppendText("slowPercent - minimum percentage to slow down\n")
    end
    --   created 1/1/06
    --   Based on plasma1.post
    --  Modified 21/6/2010
    --  added option for 'nil' plate marker z
    --  Added support for plate marker tool type as well as tool number based plate marker
    -- Modified 4/11/2010
    -- Added: Reference the torch on the first pen down if the plate marker is the first tool used.
    post.DefineVariable("refDistance",sc.unitLINEAR,0,1e17)
    post.DefineVariable("refFeed",sc.unitFEED,0,1e17)
    post.DefineVariable("switchOffset",sc.unitLINEAR,-1e17,1e17)
    post.DefineVariable("slowRadius",sc.unitLINEAR,-1e17,1e17)
    post.DefineVariable("slowPercent",sc.unitPERCENT,-1e17,1e17)
    function OnInit()
       offX = 0
       offY = 0
       offZ = 0
       post.SetCommentChars ("()", "[]")  --make sure ( and ) characters do not appear in system text
       post.Text (" (Filename: ", fileName, ")\n")
       post.Text (" (Post processor: ", postName, ")\n")
       post.Text (" (Date: ", date, ")\n")
       if(scale == metric) then
          post.Text (" G21 (Units: Metric)\n") --metric mode
       else
          post.Text (" G20 (Units: Inches)\n") --inch mode
       end
       post.Text (" F1\n G53 G90 G40\n")
       minArcSize = 0.2 --arcs smaller than this are converted to moves
       firstRef = true
       currentZAxis = "Z"
       dist = 9999999
       lastz = 0
       thcstate = 1
       ThcOff()
    end
    function OnNewLine()
       post.Text ("N")
       post.Number (lineNumber, "0000")
       lineNumber = lineNumber + 10
    end
    function OnFinish()
       endZ = safeZ
       OnRapid()
       endX = 0
       endY = 0
       offX = 0
       offY = 0
       offZ = 0
       OnRapid()
       post.Text (" M05 M30\n")
    end
    function OnRapid()
       if(endX > 1e17 and endY > 1e17) then return end
       local len = math.hypot((endX + offX)-currentX , (endY + offY)-currentY)
       dist = dist + len
       post.ModalText (" G00")
       post.ModalNumber (" X", (endX + offX) * scale, "0.0000")
       post.ModalNumber (" Y", (endY + offY) * scale, "0.0000")
       if(offZ and firstRef == false and currentZ ~= safeZ) then
          post.ModalNumber (" " .. currentZAxis, (endZ + offZ) * scale, "0.0000")
       end
       post.Eol()
    end
    function OnMove()
       local len = math.hypot(endX - currentX , endY - currentY)
       dist = dist + len
       if(len > slowRadius) then
          ThcOn()
       end
       post.ModalText (" G01")
       post.ModalNumber (" X", (endX + offX) * scale, "0.0000")
       post.ModalNumber (" Y", (endY + offY) * scale, "0.0000")
       if(offZ) then
          post.ModalNumber (" " .. currentZAxis, (endZ + offZ) * scale, "0.0000")
       end
       post.ModalNumber (" F", feedRate * scale, "0.0###")
       post.Eol()
    end
    function OnArc()
       local radius = math.hypot(currentX - arcCentreX, currentY - arcCentreY)
       dist = dist + radius * math.abs(arcAngle)
       if (radius < slowRadius) and (math.abs(arcAngle) > 0.5) then
          feed = (radius / slowRadius)
          if(feed < slowPercent) then
             feed = slowPercent
          end
          feed = feed * feedRate
          ThcOff()
       else
          feed = feedRate
          ThcOn()
       end
       if(arcAngle <0) then
          post.ModalText (" G03")
       else
          post.ModalText (" G02")
       end
       post.ModalNumber (" X", (endX + offX) * scale, "0.0000")
       post.ModalNumber (" Y", (endY + offY) * scale, "0.0000")
       if(offZ) then
          post.ModalNumber (" " .. currentZAxis, (endZ + offZ) * scale, "0.0000")
       end
       post.Text (" I")
       post.Number ((arcCentreX - currentX) * scale, "0.0000")
       post.Text (" J")
       post.Number ((arcCentreY - currentY) * scale, "0.0000")
       post.ModalNumber (" F", feed * scale, "0.0###")
       post.Eol()
    end
    function ThcOff()
       if(not thcOffCode) then return end
       if(thcstate ==1) then
          thcstate = 0
          post.Text(thcOffCode)
          post.Text(" (THC off)\n");
       end
    end
    function ThcOn()
       if(not thcOnCode) then return end
       if(toolClass == "MarkerTool") or tool > 99 then return end
       if(thcstate ==0) then
          thcstate = 1
          post.Text(thcOnCode)
          post.Text(" (THC on)\n");
          return
       end
       if(thcstate == 2) then
          thcstate = 0
       end
    end
    function OnPenDown()
       if(toolClass == "MarkerTool") or tool > 99 then
          if (firstRef) then
             Reference()
             post.ModalText (" G00")
             post.Text(" Z")
             post.Number (safeZ  * scale, "0.0000")
             post.Eol()
             offX = scriberX
             offY = scriberY
             offZ = scriberZ
             post.ModalNumber (" X", (currentX + offX) * scale, "0.0000")
             post.ModalNumber (" Y", (currentY + offY) * scale, "0.0000")
             post.Eol()
          end
          if (offZ) then
             post.ModalNumber (" " .. currentZAxis, (currentZ + offZ)  * scale, "0.0000")
             post.Eol()
          end
          post.Text(" M08\n")
       else
          if(dist >= refDistance) then
             dist = 0
             Reference();
          end
          post.ModalText (" G00")
          post.Text(" Z")
          post.Number (pierceHeight  * scale, "0.0000")
          post.Eol()
          if (preheat > 0) then
             post.Text ("\n G04 P")
             post.Number (preheat,"0.###")
             post.Eol()
          end
          post.Text ("\n M03\n")
       end
       if (pierceDelay > 0) then
          post.Text (" G04 P")
          post.Number (pierceDelay,"0.###")
          post.Eol()
       end
    --   thcstate = 2 --leave THC off for plunge move
    end
    function Reference()
       firstRef = false
       if (refHome) then
          post.ModalText(" G28.1 Z")
          post.Number(3 * scale, "0.00")
       else
          post.ModalText(" G31 Z -100")
       end
       post.ModalNumber (" F", refFeed * scale, "0.0###")
       post.Eol()
       post.ModalText(" G92 Z0.0\n")
       post.ModalText (" G00")
       post.Text(" Z")
       post.Number (switchOffset * scale, "0.0000")
       post.Eol()
       post.ModalText(" G92 Z0.0\n")
    end
    function OnPenUp()
       if(toolClass == "MarkerTool" or tool > 99) then
          post.Text(" M09\n")
       else
          post.Text (" M05\n")
       end
       if (endDelay > 0) then
          post.Text (" G04 P")
          post.Number (endDelay,"0.###")
          post.Eol()
       end
    end
    function OnNewOperation()
       post.Text (" (Operation: ", operationName, ")\n")
    end
    function OnToolChange()
        if (toolClass == "MarkerTool"  or tool > 99 ) then
             ThcOff()
             if(scriberAxis and scriberAxis ~= currentZAxis) then
                endZ = safeZ
                OnRapid()
                currentZAxis = scriberAxis
             end
             if(firstRef ~= true) then
                offX = scriberX
                offY = scriberY
                offZ = scriberZ
             end
        else
             if(scriberAxis and scriberAxis == currentZAxis) then
                endZ = safeZ
                OnRapid()
                currentZAxis = "Z"
             end
             offX = 0
             offY = 0
             offZ = 0
        end
    end
    function OnNewPart()
       post.Text(" (Part: ",partName,")\n");
    end
    function OnDrill()
       OnRapid()
       currentX = endX
       currentY = endY
       OnPenDown()
       endZ = drillZ
       OnMove()
       OnPenUp()
       endZ = safeZ
       OnRapid()
    end
    function OnComment()
      post.Text(" (",commentText,")\n")
    end
     
    Peter Van Der Walt likes this.
  23. Peter Van Der Walt

    Peter Van Der Walt OpenBuilds Team
    Staff Member Moderator Builder Resident Builder

    Joined:
    Mar 1, 2017
    Messages:
    13,675
    Likes Received:
    4,057
    Sweet, appreciate it! Checking out now
     
  24. RanchRifle

    Builder

    Joined:
    Oct 22, 2016
    Messages:
    10
    Likes Received:
    3
    May I ask what CAD and CAM software you are using?
     
  25. mytechno3d

    mytechno3d Veteran
    Builder

    Joined:
    Dec 15, 2013
    Messages:
    108
    Likes Received:
    311
    Hello
    To create my gcode file ( cam software ) i use Sheetcam ( not free but very usefull) , and as CAD software , it depend , i can use sketchup , autocad or solidworks .
     
  26. RanchRifle

    Builder

    Joined:
    Oct 22, 2016
    Messages:
    10
    Likes Received:
    3
  27. pipeline

    pipeline New
    Builder

    Joined:
    Apr 17, 2019
    Messages:
    2
    Likes Received:
    0
    I am new to this forum.

    I'm interested in building one of these machines.

    Could I purchase the specific 5mm aluminum plates from you ?

    Is it possible to ship the aluminum plates to Florida, United States ?

    Thanks
    Pipeline
     
  28. mytechno3d

    mytechno3d Veteran
    Builder

    Joined:
    Dec 15, 2013
    Messages:
    108
    Likes Received:
    311
    Hello , Yes is it possible .
    I will contact you on PM
     
  29. pipeline

    pipeline New
    Builder

    Joined:
    Apr 17, 2019
    Messages:
    2
    Likes Received:
    0
    Thanks
    Greatly appreciate that.
    Regards
     
  30. Dronedad

    Dronedad New
    Builder

    Joined:
    Oct 17, 2019
    Messages:
    1
    Likes Received:
    0
    Hi,

    I’m wondering if you could give me a price on the aluminium plates for this project shipped to Australia?

    Also do you have a shopping list for all other materials to complete this build?

    Thanks
     

Share This Page

  1. This site uses cookies to help personalise content, tailor your experience and to keep you logged in if you register.
    By continuing to use this site, you are consenting to our use of cookies.
    Dismiss Notice