Welcome to Our Community

Some features disabled for guests. Register Today.

Emmett-Delta

Discussion in '3D printers' started by David Bunch, Jan 8, 2016.
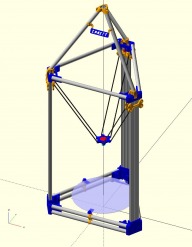
  1. Cobalt Griffon

    Builder

    Joined:
    Oct 5, 2015
    Messages:
    20
    Likes Received:
    0
    Hi David,
    That's exactly what I was thinking of, thanks for posting the design :) I did a test assembly with one of my towers this morning, I'm getting 3mm of flex at the center of a 1.5m tower, but it feels like it just needs some form of constraint at a few points to be quite solid.
    Here's a picture of the completed top and bottom:
    IMG_20161015_125420343_HDR (2).jpg
    And here's the flexing at the midpoint of one of the towers:
    IMG_20161015_103812341 (2).jpg

    I'm thinking that adding 4-5 of those ribs between the tubes should reduce this issue drastically. I'll see about getting some of those spacers printed over this weekend.
    Edward
     
  2. David Bunch

    David Bunch Veteran
    Builder

    Joined:
    Oct 27, 2014
    Messages:
    623
    Likes Received:
    429
    That is looking pretty cool. I will be interested to see how you incorporate those spacers. One thing I noticed with my assembly in openscad is you might have to adjust the top idler offset and or the motor plate for proper belt alignment. With the design like it is, this should be a lot easier to adjust than having to modify the vertex parts. I had to adjust the taper shim 2mm shorter to get a better path for the belt.
     
  3. David Bunch

    David Bunch Veteran
    Builder

    Joined:
    Oct 27, 2014
    Messages:
    623
    Likes Received:
    429
    In case you want a slider that will give you a wider Arm spacing, I modified Jerry's Delta-Six slider to make it more customizable & think this should work with the full size Wheels. Where the rod ends connect to the carriage is 75.2mm. Of course you should be able to use a different carriage with it. Here are a couple of screen shots of the design. I can add the openscad file if you want, but it needs a little more tweaking to adjust other options.
    EMT_Jerry_Slider3dView_Rev28.JPG EMT_Jerry_SliderSideView_Rev28.JPG
     
  4. Cobalt Griffon

    Builder

    Joined:
    Oct 5, 2015
    Messages:
    20
    Likes Received:
    0
    Hi David,
    I've already printed your remix of the Folger Tech carriages and sliders, but having some other options is definitely good. As to the arm spacing, I'm only planning to mount 1 Prometheus series hot-end on the effector platform, so something the size of a standard Kossel effector should work just fine.
    Edward
     
  5. David Bunch

    David Bunch Veteran
    Builder

    Joined:
    Oct 27, 2014
    Messages:
    623
    Likes Received:
    429
    If you have not glued the verticals together yet, here is another solution that should work. You can use this jig to drill 2 holes in the vertical pipes at each spot you need to pull the pipes together & use 2 screws with locknuts to pull them together. The 2 holes are offset by 11mm to miss each other, but probably could go less than that. You might need to do this at 3 spots for your long verticals. The length of screws will probably need to be 50mm or 2". The variable Dr_Hole_OD = 4.5; sets the diameter of the hole you want to drill. I was initially thinking of drilling 4 holes, but then realized that drilling 2 holes diagonally would probably work better. Just have to make sure the screw head or locknut do not interfere with the carriage. I included a screen shot, STL file & openscad file.

    EMT12_VerticalDrillGuide_2Holes.jpg
     

    Attached Files:

  6. Cobalt Griffon

    Builder

    Joined:
    Oct 5, 2015
    Messages:
    20
    Likes Received:
    0
    Nice jig for bolting the towers, I've just glued one of them up with the printed spacers, I'll post some pics of the end result later tonight. I've also posted some more pictures of the triangles on my blog: Cobalt Griffonary: Project: Proteus Delta part 1
    Edward
     
  7. David Bunch

    David Bunch Veteran
    Builder

    Joined:
    Oct 27, 2014
    Messages:
    623
    Likes Received:
    429
    What kind of limit switch & have you figured out how to mount that? I was working on using the limit switch board like the one used on the Folgertech Kossel & this is what I have so far. It currently does not quite match the micro limit switch bolt, but should hit the carriage or slider. Here is a screen shot & a STL file if you want to take a look at it. With the Duet board, you might be using something completely different.
    Delta_EMT_LimitSwitchBracke_Rev5.jpg
     

    Attached Files:

  8. Cobalt Griffon

    Builder

    Joined:
    Oct 5, 2015
    Messages:
    20
    Likes Received:
    0
    Hi David,
    I'm using this micro switch:Endstop mechanical limit switch with wire (for delta )
    It's basically the switch from the Folger tech module, just without the circuit board :)
    Dimension wise, the screw holes are 2mm on a 6.15mm spacing, width = 12.7mm, height = 6.5mm, and thickness = 5.8mm
    I'm using the exact same switch on both of my previous deltas, and they're very reliable.
    I'm currently gluing up tower number 2, those jigs you designed work quite well :)
    IMG_20161018_193803537 (2).jpg
    That's the first tower, fresh off the jig. The sawhorse I'm using as a platform has a piece of 2 by 6 for a top, makes for a very stable surface.
    Edward
     
  9. David Bunch

    David Bunch Veteran
    Builder

    Joined:
    Oct 27, 2014
    Messages:
    623
    Likes Received:
    429
    That switch should work better in that tight area. See if this will work for you. I made this 3mm thick instead of 4mm as it did not seem to be that thick with just a limit switch attached. Should only take a half hour or so to make a test print. I thought about making the bracket an optional 2 part bracket in case it needs to go on after the top vertex is on, but rotating the clamps 90 degrees which I thought would be the best orientation causes the top wheel to hit. It is great having the assembly in place while designing to see those problems without having to do a test print. I could probably make it a 2 part bracket by rotating it 45 instead of 90. I might look at that tomorrow just to see if it would be a good alternative.
    Delta_EMT_LimitSwitchBracke_Rev7.jpg
     

    Attached Files:

  10. Cobalt Griffon

    Builder

    Joined:
    Oct 5, 2015
    Messages:
    20
    Likes Received:
    0
    Hi David,
    Thanks for making that so quickly, I just finished gluing the last tower together this afternoon. I'll print one of these and do some test fits tomorrow, but it looks like it should fit nicely.
    Edward
     
  11. David Bunch

    David Bunch Veteran
    Builder

    Joined:
    Oct 27, 2014
    Messages:
    623
    Likes Received:
    429
    It should be close, but you may have to shim it out a hair, or I might have to adjust it a mm or so one way or the other to be centered on the micro adjust screw. One test print should be able to tell how much to adjust it. The top wheel might also hit the bracket, but with the M3 micro-adjust limit screw in place looks like it should miss it. I figured it was better to make that extension as short as possible to start with. I have a few of the limit switches similar to these Micro Limit Switch and probably more easily found than your smaller size, so I will make a version for that especially since I can test fit one of those.
     
    #41 David Bunch, Oct 21, 2016
    Last edited: Oct 21, 2016
  12. David Bunch

    David Bunch Veteran
    Builder

    Joined:
    Oct 27, 2014
    Messages:
    623
    Likes Received:
    429
    Your Build log looks pretty good. Drilling those holes in the horizontal EMT can be a little challenging with a hand held drill even with the drill jigs. I tried a few with it & had a couple I had to drill again, but since I had a $60 drill press from Harbor freight, I used that for the rest of the drilling. That is kind of why I made those vertex brackets in case someone did not want to drill all those holes. I think drilling is a stronger fit though & certainly uses less plastic. Probably drilling one hole at the ends & then using 1 bracket instead would probably be just as strong especially on a smaller Delta build.
     
  13. David Bunch

    David Bunch Veteran
    Builder

    Joined:
    Oct 27, 2014
    Messages:
    623
    Likes Received:
    429
    Here is a 2 part bracket design to test if you prefer this type. I rotated the tightening mounts 45 degrees to miss the upper wheel & switch. Looking at this further, might have to recess those M2 nuts & shim the M2 screws out to get just the right length for the screws so they do not hit the vertical EMT.
    Delta_EMT_MechLimitSwitch2PartBracket_Rev8.jpg
     

    Attached Files:

  14. David Bunch

    David Bunch Veteran
    Builder

    Joined:
    Oct 27, 2014
    Messages:
    623
    Likes Received:
    429
    This was my 2nd print using the switch style I mentioned. My slider is about 7mm off the face of the EMT & looks like I have room to move it at least 2mm closer to be a good connection to switch. The slider I printed is not completely flat, but works good for a test fit. Here are 3 photos of it. I am using M2.5x12mm screws & the screws are right against the EMT, so will offset the bracket another .5 to 1mm, but I am happy with how well it works. Only 1 of the locknuts touches the EMT, but have room to shift the switch 1 or 2mm to miss it. I used the 2 part bracket.
    IMG_1528_800x600.jpg IMG_1529_800x600.jpg IMG_1530_800x600.jpg
     
  15. Cobalt Griffon

    Builder

    Joined:
    Oct 5, 2015
    Messages:
    20
    Likes Received:
    0
    Hi David,
    Looks pretty good, I'm using the micro-switch variant that lacks the little roller, so I'll probably end up with the switch bumping on one of the shoulders, but that's fine, I tend to use the software offsets when calibrating anyways. I'm planning to use the two part bracket as well, much easier to install the end-stops after the main frame is assembled:)
    Edward
     
  16. David Bunch

    David Bunch Veteran
    Builder

    Joined:
    Oct 27, 2014
    Messages:
    623
    Likes Received:
    429
    I added a zip file with both with micro limit switch & regular size limit switch bracket to the files area. This has the STL & openscad files in case you or someone else needs to adjust the dimensions for the switch. There are also some STL files in there that are referenced by the openscad files used to show the assembly of them.

    Delta_EMT_MicroMech_LimitSwitch2PartBracket_Rev16.scad is the smaller switch like you are using.
     
  17. David Bunch

    David Bunch Veteran
    Builder

    Joined:
    Oct 27, 2014
    Messages:
    623
    Likes Received:
    429
    Think I have all the parts designed for the version that uses 1/2" EMT for both the Horizontal & Verticals. This Delta Assembly is currently sized for a 300mm Build Diameter & using 1000mm length verticals. Looks like I might get about 21" build height with this configuration. Here is a screen capture of the Assembly. I am planning to mount the P/S on the side similar to the way my Folger Tech Kossel 2020 is. I added a screen capture of that bracket also. I am going to look the vertex parts over some more before printing any of those. Every time I printed them before, I found something else I wanted to change. I am going to do a test print of the P/S bracket tomorrow to make sure it seems sturdy enough.
    Emmett-Delta_18mmEMT_Assembly_Rev14.jpg 18mm_PS_Bracket_Rev2.JPG
     
  18. Cobalt Griffon

    Builder

    Joined:
    Oct 5, 2015
    Messages:
    20
    Likes Received:
    0
  19. David Bunch

    David Bunch Veteran
    Builder

    Joined:
    Oct 27, 2014
    Messages:
    623
    Likes Received:
    429
    Looks like you have the hardest part behind you now. I was thinking you could glue the pipes together without those plastic spacers. Did the spacers help keep it together better while gluing? What value did you set for Ht with the EMT_4x18mmEMT_GlueSpacer.scad file for printing the spacers? It was too bad you lost a foot of build height, but that was pretty tall. I like your plywood idea on the top & bottom. Maybe I should put an optional countersunk screw hole in that little base under the vertical EMT?

    I am working on fine tuning the vertex parts for a smaller build with a 200mm MK2Y round heatbed. I have the volume of a vertex down to less than 90 cubic centimeters without the extended height.
     
  20. Cobalt Griffon

    Builder

    Joined:
    Oct 5, 2015
    Messages:
    20
    Likes Received:
    0
    Hi David,
    Those spacers made it much easier to glue the pipes together, I just put the glue on the spacers and clamped things down. I ended up setting Ht to 24, which made the spacers the perfect size for working with. And yes, putting a countersunk hole in that base under the vertical EMT would definitely work, I actually considered drilling one there myself, but I decided to use the EMT mounting brackets instead so I didn't crack something :)

    Sounds like you're doing a good job with the small scale versions of the corners, I would recommend using one of the aluminum MK3 heatbeds if you can get it, I had one of those MK2 PCB heaters on my Kossel originally, and had to replace it after it warped itself.

    Edward
     
  21. David Bunch

    David Bunch Veteran
    Builder

    Joined:
    Oct 27, 2014
    Messages:
    623
    Likes Received:
    429
    My folger tech turns out to have that MK3 alum. heatbed, so will probably get that one or one similar. I was going to print one of the new vertex designs today on my mini Kossel, but my printers seems to have a problem. I think the motors are skipping. I am using a Ramps board with DRV8825's I changed from the A4988's. Think I may need to up the voltage a little on the steppers. I am currently at .6volts for each of them. Folger tech recommended try upping them to .7volts. I am going to switch to 32bit electronics on my next delta.

    I have changed a couple of small things in the vertex & bracket designs. I added that hole in the center of base where the verticals go & added a 14.5mm cylinder around that 4.5mm hole to make sure it was strong enough. A M4 cap screw head fits nicely between those 4 vertical 1/2" EMT. I also noticed on the heat bed bracket that the hole did not go all the way thru in case the screw extended beyond the locknut, so I changed that. I am going to go thru these changes & clean up the openscad files in the next week & update the 3/4" version & add this 1/2" version. On the smaller 200mm build dia. looks like I will need to put the electronics on the outside, but will make a bracket for that when I decide what I am using. The P/S bracket looks like it is strong enough & will work well. I did notice I had the locknut for that bracket on the side of the P/S so moved that to the inside so the P/S face does not rub against that screw. The 1/2" horizontal EMT's are only10.5" (266.5mm) long for the 200mm size & 16.628" (422.35mm) for the 300mm size.

    I was also looking at 1/2" PVC for a smaller build as it is so much lighter than EMT & might be strong enough for a smaller build. The outside diameter of the 1/2" is a little more than the 1/2" EMT at 21.3mm.
     
  22. David Bunch

    David Bunch Veteran
    Builder

    Joined:
    Oct 27, 2014
    Messages:
    623
    Likes Received:
    429
    I found my problem with the printer. Seems like it had a little plastic debris in one of the belts. I might have to design a little belt guard to keep me from getting plastic on it when pulling parts off the bed. This print is about 1/3 done, only 4 or 5 hours to go. I added an extra disc to the print in order to get slc3r to put the print more in the center of build plate.
    This is 40% infill with white PLA. My final prints will be in PETG. I am still deciding on what color to use for the vertex parts, but am leaning towards green.
    IMG_1554_800x600.jpg
     
  23. David Bunch

    David Bunch Veteran
    Builder

    Joined:
    Oct 27, 2014
    Messages:
    623
    Likes Received:
    429
    This print took about 7 hours & weighs 3.4oz with the 40% infill & feels quite solid. The volume of the part is currently 88.03 cubic centimeters. I added some holes to access the inside of the EMT horizontals in case I want to run something thru there. I made this a combination motor / idler mount similar to the Delta-Six & made opening for the motor & idler elliptical along the Z-axis which should allow for some tensioning of the belt with the idler part. I need to print a test print of the idler bracket & assemble that on to make sure that works ok before printing the final 6 vertex parts. I am pretty happy with this design so far. This is the 1st time I actually printed a vertex with the 4x 1/2" EMT cuts & they seem to fit nicely. I added a 1.5mm chamfer cut where the 4 verticals are inserted which makes it easier to attach them. When the part first came off the printer, thought I might need to make the tensioning bolt slot wider than the 2mm, but after putting the 4 verticals in, that seems sufficient.
    IMG_1559_800x600.jpg IMG_1560_800x600.jpg IMG_1557_800x600.jpg IMG_1558_800x600.jpg
     
  24. David Bunch

    David Bunch Veteran
    Builder

    Joined:
    Oct 27, 2014
    Messages:
    623
    Likes Received:
    429
    I am finally getting into printing the vertex parts for a 1/2"EMT Horizontal & Vertical Build option. I got side tracked for a couple of weeks on upgrading my Makerfarm prusa i3v 10" to a titan extruder. That was a little pain putting together, but is working nicely.

    Below are 3 photos showing my Emmett-Delta progress. Only the green vertex part is a final print. The others are just test prints to make sure the idler bearings line up with the carriage beltway & the limit switch hits the slider. I plan on making this build using 10.5" 1/2" EMT horizontals & 31.5" (800.1mm) verticals. I should be able to use the MK3 round aluminum 220mm diameter heat bed & have a build height in the 375-400mm range.

    The vertex parts for this build only weight about 3oz. each at 50% infill with eSun PETG & take a little over 6 hours each to print. The vertex I am using for the bottom can be used for both top & bottom, but no adjustment for the belt. The top vertex has a 6mm adjustment height for the idler. Speaking of the idler, I made that idler plate a lot smaller as it did not need to be as big as I originally made it. After test fitting this, I decided to add a screw head recess for the idler plate, so I could use more standard M5x16mm screws. The idler bolt is a M5x40mm screw, but probably could use a M5x35mm.

    I have also been working on putting all these files on Github to organize them better. Here is the link to that:

    GitHub - geodave810/Emmett-Delta: Delta 3d Printer using Electrical Metal Tubing (EMT)

    These files are work in progress, so some of them may change. I am also adding an option to use 1/2" PVC horizontally and/or Vertically.
    IMG_1656_800x600.jpg IMG_1657_800x600.jpg IMG_1658_800x600.jpg
     
  25. David Bunch

    David Bunch Veteran
    Builder

    Joined:
    Oct 27, 2014
    Messages:
    623
    Likes Received:
    429
    I have 3 vertex parts printed & should get another 2 of them done today. I am starting to think about building this shorter to be more stable & maybe not have to glue the verticals together. If I cut the verticals to 650mm long that should still give me about 10" build height. That gives me a span of about 22.5" of where the bottom vertex & top limit switch bracket connects to the 4x vertical EMT.

    I was also thinking about Edward's idea Cobalt Griffonary: Project: Proteus Delta part 2 of adding a bottom wood plate, but I would like it to be open on the inside to access the motors & belts. I added a hole to the center of each vertex after seeing his idea. Here is what I am thinking of cutting on my CNC router. I should be able to cut this out of a piece of either 1/2" or 3/4" 14.6" Long x 12.8" Wide plywood for this size build.

    Since I have not printed the final bottom vertex parts yet, I am going to add surface under the outside 2 vertical EMTs with a screw hole under each to have more clearance to attach a locknut for adding the bottom wood plate. It would be a tight fit for a locknut in the center between the 4 vertical 1/2" EMTs. Seems like there is always something to improve on these vertex parts.
    BottomFrame_Rev4.jpg
     
    #55 David Bunch, Nov 22, 2016
    Last edited: Nov 22, 2016
  26. David Bunch

    David Bunch Veteran
    Builder

    Joined:
    Oct 27, 2014
    Messages:
    623
    Likes Received:
    429
    I printed a paper template on 3 pieces of paper to see how it looks. The 2 vertex parts in the photo are actually the top vertices. I did not cut the template all the way to the outside lines of where it will be cut since I just wanted to see how it looked. Guess I will have to put my MPCNC router back together & cut it.
    IMG_1662_800x600.jpg
     
  27. David Bunch

    David Bunch Veteran
    Builder

    Joined:
    Oct 27, 2014
    Messages:
    623
    Likes Received:
    429
    I had a thought in the night about making this bottom frame out of plastic with dovetail joints instead of wood. I have used these dovetail joints successfully on other parts for my Makerfarm i3v printer. The main purpose of these parts is to hold the 3 vertex parts together so no holes thru the horizontal pipes are needed. The dovetail parts connect to the vertex at 2 points. One screw vertically centered under a Vertical 1/2" EMT & 1 horizontally between the horizontal pipes. The center part is 175x153mm & the longest dovetail part is 187mm. Having it in plastic should be easier for others to create, since anyone making this printer should already have a printer, but not necessarily a CNC machine. I added some holes to the parts to allow connecting electronics or something else in the middle. The hole patterns might change & I will probably add a nut trap for the holes at the bottom of the dovetail parts. With this method I am hoping to not need to drill the horizontal pipes, but use this along with the vertex brackets. I am guessing it will take about 2.5 hours per part to print. 7 parts to print.

    This is sized for a 220mm round MK3 heat bed. Could probably size this for bigger builds, but have to add another dovetail joint. A 300mm build plate, looks like the extra joint would be about 162mm long. Here are a couple of screen shots of the design to show what it currently looks like.
    BottomDoveTailFrame_Assembly_Rev5.jpg BottomDoveTailFrame_Rev5.jpg
     
  28. Cobalt Griffon

    Builder

    Joined:
    Oct 5, 2015
    Messages:
    20
    Likes Received:
    0
    Hi David,
    That printed base idea looks really good, should provide a nice support for building everything else on top of. :)
    Edward
     
  29. David Bunch

    David Bunch Veteran
    Builder

    Joined:
    Oct 27, 2014
    Messages:
    623
    Likes Received:
    429
    Thanks. I went ahead & did a version for a 300mm build plate to see how it looked. The length of the middle dovetail joint is 162mm & the inside supports are 175mm long.
    Here is what that version looks like.
    BottomDoveTailFrame_300mm_Rev6.jpg
     
  30. David Bunch

    David Bunch Veteran
    Builder

    Joined:
    Oct 27, 2014
    Messages:
    623
    Likes Received:
    429
    I have been reading your build log & looks like your machine is coming right along. How was the fit for the vertical 4x 1/2" EMT? I noticed that after I changed my wades extruder to the titan extruder, they were a little looser fit. Before printing my bottom vertex parts I am probably going to change that 18.4mm for the cuts to 18.2mm or less & adding an extra 1mm of tightening gap on the back of the vertex & making that gap go all the way thru the bottom of the vertex.
     

Share This Page

  1. This site uses cookies to help personalise content, tailor your experience and to keep you logged in if you register.
    By continuing to use this site, you are consenting to our use of cookies.
    Dismiss Notice