Welcome to Our Community

Some features disabled for guests. Register Today.

Routy CNC Router (V-Slot Belt & Pinion)

Discussion in 'CNC Mills/Routers' started by Mark Carew, Nov 11, 2013.
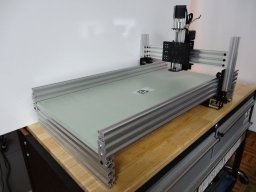
  1. Mark Carew

    Mark Carew OpenBuilds Team
    Staff Member Moderator Builder Resident Builder

    Joined:
    Jun 28, 2013
    Messages:
    2,744
    Likes Received:
    2,409
    There is no reason I can see why you can't use the same belt on top since each gantry plate is independently controlled like in the video below. In fact we set this up as a test bed when experimenting with the belt and pinion and it worked great.
    Bryant maybe you can incorporate this idea into one of your builds it would be a super cool machine for sure.

     
  2. Bryant

    Bryant New
    Builder

    Joined:
    Dec 6, 2013
    Messages:
    33
    Likes Received:
    7
    Ordered almost everything for the basic build. The second Gantry will have to wait until I get the first going. The store was short 1 Stepper Motor and I'm going to have to wait for the lead screw nut.

    BTW, Mark, what leadscrew did you use?
     
  3. Mark Carew

    Mark Carew OpenBuilds Team
    Staff Member Moderator Builder Resident Builder

    Joined:
    Jun 28, 2013
    Messages:
    2,744
    Likes Received:
    2,409
    Hello Bryant, thank you for the support!
    We apologize for that and they should be in soon.
    As for the lead screws and nuts we have been working up prototypes here and experimenting with different sizes. We are most happy so far with Tr6*9 and 8*4
    We figure the 6mm can be used on light duty applications where speed is wanted and the 8 can be used on larger load projects where speed is not a factor. I used a 1/4 20 on the Routy because that is what I had at the time.
    Here are a couple teaser pics as we dial these in in the pic are the 6 and 8 metric acme and the acme nut blocks as well as the acme nut plates, not ETA yet as we want to try a few more things but they will be coming to the OpenBuilds Part Store soon! :)
    DSC03226.JPG
    DSC03229.JPG
    DSC03225.JPG
     
  4. Nick Lancaster

    Builder

    Joined:
    Dec 20, 2013
    Messages:
    60
    Likes Received:
    13
    The screw down the inside of the v-slot rail is brillant! I am so stealing that idea for a project!

    Needs more video of Routy in operation! :D
     
    #34 Nick Lancaster, Dec 21, 2013
    Last edited: Dec 21, 2013
  5. Mark Carew

    Mark Carew OpenBuilds Team
    Staff Member Moderator Builder Resident Builder

    Joined:
    Jun 28, 2013
    Messages:
    2,744
    Likes Received:
    2,409
    :D
     
    Public Do Omens likes this.
  6. Nick Lancaster

    Builder

    Joined:
    Dec 20, 2013
    Messages:
    60
    Likes Received:
    13
    It is a little unclear from the pictures. And we have yet to see any video. Are you running 2 steppers off one channel of the grblshield?
     
  7. Mark Carew

    Mark Carew OpenBuilds Team
    Staff Member Moderator Builder Resident Builder

    Joined:
    Jun 28, 2013
    Messages:
    2,744
    Likes Received:
    2,409
    Sorry @Nick Lancaster the plan is to post the wiring and software setup when we finish up with the OX since they are both the same but thats taking a little while longer then we thought :) Yes we are running the Y axis doubled from the same driver on the GRBL shield
    Hope to have more info up soon after the holidays.
    Mark
     
  8. Nick Lancaster

    Builder

    Joined:
    Dec 20, 2013
    Messages:
    60
    Likes Received:
    13
    Well get on it! We want more info! :D

    Understandable, holidays throw a spanner into alot of things. My cnc router has been offline since thanksgiving because I haven't had time to work on it, and its been so cold out.
     
  9. Mark Carew

    Mark Carew OpenBuilds Team
    Staff Member Moderator Builder Resident Builder

    Joined:
    Jun 28, 2013
    Messages:
    2,744
    Likes Received:
    2,409
    You know I want to, and can't wait! :D
     
  10. Colin Russon

    Builder

    Joined:
    Dec 4, 2013
    Messages:
    47
    Likes Received:
    24
    I have been thinking about this Dual Y motor operation for some time. It's ok as an idea but I am not keen on running two motors from one driver. A potential solution would be to replace the Y Motor with a double shafted motor with much higher Torque and then attach a center rod to the inner side with a pulley on the other end to attach to the other drive side of the machine.

    I have attached a video showing one idea but it may also be feasible to adapt the design to centralize the motor and have smaller rods coming off either end so that the pulleys were both on the ends of the rods so disengaged from the motor all together. Either way this would potentially reduce the inherent racking problem and 'load' of two motors on one driver.

    I hope this invites discussion.

     
    Public Do Omens and Pawlenko M like this.
  11. Nick Lancaster

    Builder

    Joined:
    Dec 20, 2013
    Messages:
    60
    Likes Received:
    13
    Colin that is done in many professional CNC machines. It has advantages and some disadvantages. The biggest disadvantage is the shaft can twist a tiny bit, solution just use a bigger shaft, perferably a hollow tube actually to reduce mass. The normal operation is to centrally mount the stepper/servo on the gantry when doing this. Easy to do.

    The advantage is 1 stepper. And they are always synced up.

    Now the dual stepper does have an big advantage if used with a 4-axis controller. You can use 2 home switches one on each side of the gantry, when the system homes it homes both y-axis motors and using good switchs can autosquare the gantry. If I build a OX style cnc router, I will probably use the Xylotex 4-axis kit to take advantage ot this.
     
  12. Colin Russon

    Builder

    Joined:
    Dec 4, 2013
    Messages:
    47
    Likes Received:
    24
    Yes, I can see that the shaft may twist on heavy use, especially metal machining but the Routy CNC is suited to light CNC work, maybe some thin aluminium or brass work but I doubt hard metals could be machined using this machine (I am hoping to be proven wrong) so the center shaft may be a better idea. I like the idea of 4 axis, and that would have been my first choice coming from a CNC background as that is why I don't like the idea of two motors on one stepper driver but the 4 axis again means an extra motor, and an extra axis board which all add to the cost. The center shaft and single Y Motor proposal may reduce the overall cost a little which for those wishing to utilize the small machines as a starter machine is a bonus. I intend to find a center rod and give this a test run in the New Year.

    The OX will be capable of heavier work so I would definitely recommend 4 axis on that.
     
  13. Nick Lancaster

    Builder

    Joined:
    Dec 20, 2013
    Messages:
    60
    Likes Received:
    13
    I have been looking into it heavily. The arduino style control with 4 steppers is barely cheaper then the Xylotex full blown hobbyist CNC board, with 4 motors and PSU.

    http://xylotex.netfirms.com/OSCommerce/catalog/product_info.php?cPath=26&products_id=40

    Get some hardened drill rod, or build up a torsion tube using steel, or alminum tubing of the appropriate ID, and shaft of the correct ID for your pulleys. Glue the shaft into the tube and you would have a very stiff for its weight drive shaft.
     
  14. Bryant

    Bryant New
    Builder

    Joined:
    Dec 6, 2013
    Messages:
    33
    Likes Received:
    7
    Anyone start a build yet? I've got everything except timing belt, and a leadscrew nut. I think I'll attempt to construct my own out of delrin. Just have to finish a project for my wife first :(
     
  15. Chris Allen

    Builder

    Joined:
    Dec 2, 2013
    Messages:
    50
    Likes Received:
    7
    I have started, but like you I haven't got the leadscrew sorted yet. Have already noticed that the parts list ought to have some double t nuts on it instead of some 2 hole joining plates. Have used single t nuts for the moment, but they aren't as good. The 2hole joining plate is a bit thick, and would need longer screws. I am impressed with the solidness of the y gantries plates I have put together.

    I am also using the cnc shield from http://blog.protoneer.co.nz which gives you a driver for all 4 axes. It does require soldering though. Looks like a good solution for budget users.
     
    #45 Chris Allen, Dec 28, 2013
    Last edited: Dec 28, 2013
  16. Colin Russon

    Builder

    Joined:
    Dec 4, 2013
    Messages:
    47
    Likes Received:
    24
    Good tip on the Protoneer Chris!
     
  17. Nick Lancaster

    Builder

    Joined:
    Dec 20, 2013
    Messages:
    60
    Likes Received:
    13
    Just be aware that the Prontoneer does not support true 4-axis without custom firmware. Grbl that is designed to work with only supports 3-axis and the prontoneer just electrically slaves the 4-th axis to X,Y, or Z. This is still an improvement over useing the grblshield and just connecting 2 motors to one driver. as you can then drive both motors at full power. Another advantage of the Prontoneer is using replaceable stepper drivers. If you blow one up, you can just swap it out, instead of the entire board.
     
  18. Mark Carew

    Mark Carew OpenBuilds Team
    Staff Member Moderator Builder Resident Builder

    Joined:
    Jun 28, 2013
    Messages:
    2,744
    Likes Received:
    2,409
    I grabbed one to give it a try as well :)
    Thanks for the tip
     
  19. Chris Allen

    Builder

    Joined:
    Dec 2, 2013
    Messages:
    50
    Likes Received:
    7
    Sorry if I didn't make that clear. I was speaking in reference to this build, for which it is fine. I would also recommend getting the drv8825 drivers as they can handle more amps for not a lot more money.
     
  20. Neil Rosenberg

    Neil Rosenberg Journeyman
    Builder

    Joined:
    Dec 29, 2013
    Messages:
    180
    Likes Received:
    177
    Hey Mark, this is really nice work. I'm planning on doing a slightly different (but derivative!) version in Inventor, will share when it makes sense.

    I do have a few questions:

    1. What's the purpose of the smaller rail on the gantry (the 20x40)? It appears to be fastened only by one screw at each end, I'm not seeing how it contributes much to system stiffness. I thought it might be there just to support the electronics and cabling, is that it?
    2. I see that you have dual V-slot gantry plates. Is this needed for stiffness of the rollers, for motor mounting, or both? I'm also wondering how you sorted out the eccentric bushings for the gantry carriage -- do you leave the back plate loose while you adjust, then tighten once the rollers are set?
    3. Do you find getting the two long rails parallel and lined up with the rollers a fussy process?

    Thanks and regards
    Neil
     
  21. Mark Carew

    Mark Carew OpenBuilds Team
    Staff Member Moderator Builder Resident Builder

    Joined:
    Jun 28, 2013
    Messages:
    2,744
    Likes Received:
    2,409
    Hi Neil,
    Looking forward to your build and the mods you add, thank you for sharing.

    1) Yes for the electronics and cabling. I liked the idea of having the control board on the machine so that only the power and USB cable run off the side.
    2) Yes having the two plates really helps to stiff in up the gantry. There is plenty of room for improvement here though as its no where near as strong as I would have liked it to be. One of the reasons for the double beam on the OX it helps some to spread the force across them.
    As for the eccentrics yes leave it a little lose then turn them in place then tighten the screws down. On the OX we used two eccentrics for each bottom wheel set so that you could adjust them sort of independently and dial them in. You can do the same for this gantry on the ROUTY build but I think its such a small spacing between the plates that its not necessary.
    3)Not so much as I really let the main gantry dictate where they end up by moving front to back with the screws loose and tighten them down with the gantry at each end and then tweak it from there. You can see in the OX build video we can just rack it about until we find the best spot then lock it down with the screws.
    Hope this helps Neil
     
  22. The Dude

    The Dude Well-Known
    Builder

    Joined:
    Jan 2, 2014
    Messages:
    243
    Likes Received:
    102
    I'm building this. Will it hold a an 8lb heavy duty router/spindle or does it have to be the lighter dremel tool?
     
  23. Chris Allen

    Builder

    Joined:
    Dec 2, 2013
    Messages:
    50
    Likes Received:
    7
    tbh I would go with the Ox if you are looking to pack that sort of hardware, I would suggest up to 1kg for the spindle on this particular machine.
     
  24. Dave Zahn

    Dave Zahn New
    Builder

    Joined:
    Jan 3, 2014
    Messages:
    9
    Likes Received:
    14
    Have you given any thought, or figured out if it would even work, if you replaced the 2 motors on the X axis with a double shaft motor and an extension rod to the other side?

    I'm always concerned about tuning and sync issues when using a slave motor.
     
  25. Mark Carew

    Mark Carew OpenBuilds Team
    Staff Member Moderator Builder Resident Builder

    Joined:
    Jun 28, 2013
    Messages:
    2,744
    Likes Received:
    2,409
  26. brianblocker

    Builder

    Joined:
    Jan 7, 2014
    Messages:
    13
    Likes Received:
    0
    Just purchased everything except the lead screw nut, 4 steppers, and the m3 cap head screws (45mm). Wish those weren't out :)

    Looking forward to building this puppy, and I'm sure I'm going to have plenty of questions. Any recommendations for a router OR max weight of the router?
     
  27. brianblocker

    Builder

    Joined:
    Jan 7, 2014
    Messages:
    13
    Likes Received:
    0
    Alright, so... can you provide links to the things that definitely worked? Much appreciated!
     
  28. The Dude

    The Dude Well-Known
    Builder

    Joined:
    Jan 2, 2014
    Messages:
    243
    Likes Received:
    102
    I've been researching this and someone said 1kg max for the router. So I am going to try to use a remote control airplane brushless DC motor refitted with a spindle and possibly a cooling system. One other person has used this before and said it does everything up to and including 3/8" aluminum plates. The weight is about 200g so with the spindle and fans it will easily be under 1kg. It's basically like getting a 1kW spindle with 0.015mm runout which would cost maybe $400 but instead is only $100 or less.
    http://www.ebay.ca/itm/171124328079

    http://www.ebay.ca/itm/151202933572
     
    brianblocker likes this.
  29. brianblocker

    Builder

    Joined:
    Jan 7, 2014
    Messages:
    13
    Likes Received:
    0
    That's not a bad idea. I have a decent-sized cheap router that is probably too big. I also have a smaller rotozip that might be borderline. Will know soon if it works hehe :)
     
  30. Mark Carew

    Mark Carew OpenBuilds Team
    Staff Member Moderator Builder Resident Builder

    Joined:
    Jun 28, 2013
    Messages:
    2,744
    Likes Received:
    2,409
    Hey guys just a little update, all the wiring and software set up for the ROUTY (as well as a few parts) will be the same as the OX ,for now at least. The OX may need a higher amp driver for the NEAM23's but for now the videos will be the same. Once I complete the wiring and software video I will post it to both places and once all the parts are complete we will update the parts list as well.
    Thanks
     

Share This Page

  1. This site uses cookies to help personalise content, tailor your experience and to keep you logged in if you register.
    By continuing to use this site, you are consenting to our use of cookies.
    Dismiss Notice