Welcome to Our Community

Some features disabled for guests. Register Today.

Sphinx XL

Discussion in 'CNC Mills/Routers' started by beardyblair, Nov 18, 2016.
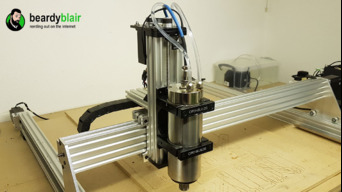
  1. beardyblair

    beardyblair Well-Known
    Builder

    Joined:
    Aug 1, 2016
    Messages:
    59
    Likes Received:
    72
    beardyblair published a new build:

    Read more about this build...
     
  2. beardyblair

    beardyblair Well-Known
    Builder

    Joined:
    Aug 1, 2016
    Messages:
    59
    Likes Received:
    72
    The build log, here goes!

    This started out as I needed a CNC machine at work to speed up our prototyping process and make us less reliant on other companies. Although the quality of work we have received has been acceptable the timeframes and cost are not. We build custom UAV's (drones), robots and functioning prototypes for the oil and gas industries and with the price of oil down we are being asked to reduce our costs. Some designs take multiple iterations during the prototyping phase and this can result in weeks of additional time waiting on parts. I want to reduce this to days or even hours.

    So my quest began to find a suitable CNC machine that was within budget and would fit our needs. I turned to google and quickly found out that there are many commercially available "hobby" CNC routers that were a close fit but the reviews, build quality (strength) and adaptability was a concern. I looked at professional versions but could not find something that had a reasonable price tag and also met our needs. It was at this point that I turned to Openbuilds. I have been involved in 3D printing for many years so have seen and worked with v slot extrusions before and knew that Openbuilds had a great 3D printing community, it was by pure chance when researching for another project (a 1m x 1m x 1m high res 3D FDM printer) that I came across KYO's build.

    After studying Kyo's build it became apparent that it was a great base and would scale up well. The engineering was well within our capabilities but we had no knowledge of GRBL and CNC controllers, as Kyo can attest, the questions came rolling into his thread.

    With my mind put at ease by the help of the Openbuilds community, I pushed the button and began ordering parts. The only problem was getting the plates made up! I needed a CNC machine! My local suppliers all let me down, national suppliers were all busy or not able to cut without hand-drawn drawings. So once again Openbuilds came to the rescue and Chris Laidlaw offered to make the plates. I took a chance and dealt with him directly, the funds were transferred and I waited for an update. From the time I paid to the parts being sent took less than two days. I can't recommend Chris highly enough, easy to deal with, great price and flawless craftsmanship.

    I took Kyo's plans and scaled up all the axis, I had ordered Chris's extended plates so had 50mm additional Z clearance. Here are the sizes of the extrusions I had cut:
    • Qty 5 20x60 V-slot 880mm base/frame
    • Qty 2 20x60 V-slot 996mm base/frame
    • Qty 3 C-beam 1000mm X, Y axis
    • Qty 1 C-beam 310mm Z axis (this could possibly be shorter, have not finalised this yet)

    And the lead screws:
    • Qty 3 1040mm - this is the full size no cutting needed
    • Qty 1 355mm

    All Openbuilds parts were ordered from ooznest.co.uk, even with the cut parts they were with me in under 3 days.

    So with a mountain of parts, it was time to start the build....

    *edited to update incorrect frame size.
     
    #2 beardyblair, Nov 24, 2016
    Last edited: Jan 18, 2018
  3. beardyblair

    beardyblair Well-Known
    Builder

    Joined:
    Aug 1, 2016
    Messages:
    59
    Likes Received:
    72
    To start with I needed a solid base so I built a table to hold the CNC, provide storage for sheet metal and carbon and house my new 3D printer (build log coming soon). It is deliberately tall to avoid me having to lean over.

    [​IMG]

    I then fired up the ipad and went to work building the base (I added the other two extrusions later, just wanted to try to keep it square. Note the additional T-nuts:

    [​IMG]

    As most of the lengths were complete or did not need to be tapped I only had to do one end of the Z-axis and two ends of the base, being alloy it was easy:

    [​IMG]

    [​IMG]

    When putting together the mini v wheels on the Y plates I had to buff down the 15mm screws as I was unable to get 12mm ones:

    [​IMG]

    [​IMG]

    [​IMG]

    Note: when using the eccentric spacers that the printed edge that reads 6mm is the maximum offset. So start with these all lined up opposite the direction of the track and work in from there:

    [​IMG]
     
    Kyo likes this.
  4. beardyblair

    beardyblair Well-Known
    Builder

    Joined:
    Aug 1, 2016
    Messages:
    59
    Likes Received:
    72
    And ta da..... notice the strategically placed T-nuts....

    [​IMG]

    So with the base build complete I went on to add a cable channel to the back by attaching a section of 20 x 20 mm alloy box:

    [​IMG]

    The limit switches:

    [​IMG]

    And an X-axis cable chain. I simply 3D printed some plastic brackets to hold a piece of 20 x 40mm alloy angle and used a left over piece of 20x40mm V slot to act as a bracket on the Z- axis. I used one and a half cable chains.

    [​IMG]

    Now to make a loom and get all the connectors on!
     
    Kyo likes this.
  5. beardyblair

    beardyblair Well-Known
    Builder

    Joined:
    Aug 1, 2016
    Messages:
    59
    Likes Received:
    72
    I have got a Raspberry Pi 3 and Protoneer hat with Pololu DRV8825 drivers. Are they going to have enough power to drive my NEMA23 345oz 3A motors?
     
  6. Darathy

    Darathy New
    Builder

    Joined:
    Jul 12, 2016
    Messages:
    74
    Likes Received:
    21
  7. beardyblair

    beardyblair Well-Known
    Builder

    Joined:
    Aug 1, 2016
    Messages:
    59
    Likes Received:
    72
    Thanks for that, been an enjoyable build so far. I kinda knew that I was going to have to upgrade to the DRV8825 or similar. Grrrr........ Just hoped they would be enough to get me going.
     
  8. Ronald van Arkel

    Staff Member Builder Resident Builder

    Joined:
    May 7, 2014
    Messages:
    472
    Likes Received:
    245
    Nope, go with some real drivers please ;).
     
  9. beardyblair

    beardyblair Well-Known
    Builder

    Joined:
    Aug 1, 2016
    Messages:
    59
    Likes Received:
    72
    Trying to locate some in the UK. No success so far. Looking like Germany has some though.....
     
  10. Ronald van Arkel

    Staff Member Builder Resident Builder

    Joined:
    May 7, 2014
    Messages:
    472
    Likes Received:
    245
    Forget the TB6600 and TB6560, those are not precise enough and not up to date. I would recommend digital drivers but they are a bit more expensive. You can use one larger driver for the 2 motors on the X-axis. For a single motor use a 4.0-5.0A peak driver, for a double motor use a 7.0-7.8A peak driver. Using 2A RMS setting for the single motor and 4A RMS for the double motor; you can tweak it later if needed. Also, use a 24 or 36VDC PSU, forget 12VDC.

    Look on eBay for the Wantai branded analog drivers, and Leadshine for digital ones. You also might check Aliexpress, most of them ship with Aliexpress Premium shipping (recommended, mostlike the service of DHL), DHL, FedEx or UPS.

    -Ronald

    EDIT: I've made a choice to go with an Arduino Uno, a screw-shield, EstlCAM "firmware" combined with the drivers above. I'm not using stepper enable. For cables get the shielded ones, also for the limit switches; no problems so far with false triggering and that without capacitors and resistors ;).
     
    #10 Ronald van Arkel, Nov 24, 2016
    Last edited: Nov 24, 2016
    Kyo likes this.
  11. beardyblair

    beardyblair Well-Known
    Builder

    Joined:
    Aug 1, 2016
    Messages:
    59
    Likes Received:
    72
    Managed to find and put on hold 3 x DQ542MA and 1 x DQ860MA - any thoughts?

    I have a 24v 350W PSU - hopefully that will be enough for it all.
     
  12. Ronald van Arkel

    Staff Member Builder Resident Builder

    Joined:
    May 7, 2014
    Messages:
    472
    Likes Received:
    245
    You just need 2 x DQ542MA drivers (Z and X), the DQ860MA if for both motors on Y. Is it a brand PSU or just a LED strip PSU? LED strip PSUs are about 200W real output but should be enough for your setup.

    -Ronald
     
  13. beardyblair

    beardyblair Well-Known
    Builder

    Joined:
    Aug 1, 2016
    Messages:
    59
    Likes Received:
    72
    QUOTE="Ronald van Arkel, post: 45384, member: 2417"]You just need 2 x DQ542MA drivers (Z and X), the DQ860MA if for both motors on Y. Is it a brand PSU or just a LED strip PSU? LED strip PSUs are about 200W real output but should be enough for your setup.

    -Ronald[/QUOTE]
    I got the three DQ542MA's as they were a deal on eBay and cheaper than two separately. The PSU is from the openbuilds store.
     
  14. Ronald van Arkel

    Staff Member Builder Resident Builder

    Joined:
    May 7, 2014
    Messages:
    472
    Likes Received:
    245
    The PSU you have was the best I could find for the price, plus they are slim and don't make noise (not that we care about that, do we? :) ). Those PSUs are real 350W and can handle even higher peaks than 350W.

    Are you going to use a Raspberry Pi 3 with a screw shield?

    -Ronald
     
  15. beardyblair

    beardyblair Well-Known
    Builder

    Joined:
    Aug 1, 2016
    Messages:
    59
    Likes Received:
    72
    Yup I have a Pi3 and protoneer shield. Just need the external driver plates now.
     
  16. Kyo

    Kyo Veteran
    Staff Member Builder Resident Builder

    Joined:
    Feb 27, 2014
    Messages:
    673
    Likes Received:
    699
    Your build is looking great, It is so cool that we have a community to share our builds. I really enjoy seeing all the progress everyone is making with their Sphinx builds.

    The OB 24v power supply is a nice unit. I have been using them in my builds since they have been added to the parts store. The DQ542MA drives are also a good choice and will work well with the Pi / Protoneer hat.. This is the same combo I run on my original plate maker. (OB 24V, OB dq542ma, pi zero, protoneer hat)
     
  17. beardyblair

    beardyblair Well-Known
    Builder

    Joined:
    Aug 1, 2016
    Messages:
    59
    Likes Received:
    72
    And already planning my next two builds............ addictive but cheaper than class A narcotics I suppose.
     
    Kyo likes this.
  18. Anthony Bolgar

    Anthony Bolgar Journeyman
    Builder

    Joined:
    Jan 14, 2016
    Messages:
    354
    Likes Received:
    198
    Only the next 2? I have 20 or thirty running around in my mad scientist brain (Along with prescription Narcotics....lol) Seriously though, keep on making!
     
  19. beardyblair

    beardyblair Well-Known
    Builder

    Joined:
    Aug 1, 2016
    Messages:
    59
    Likes Received:
    72
    I have way more than 2 builds going on but most of them fly or collect data. My ideas book has become a few idea books and I have to be selective on which ones I work on. The builds on here will help me with the execution of future builds/ideas.

    Update on this build:
    Ordered the drivers on Ebay from the "wantaimotor" shop. All listings were in Germany and had "German Ship & Free" in the title. My DQ5423MA's arrived within 3 days and are here waiting to go in. Unfortunately, I was contacted within a few hours of purchasing the larger DQ860MA driver to be asked if it was OK to send the item from China. The seller has 7 other listings showing the DQ860MA in stock and in Germany yet wanted to send from China. I explained that I ordered from Germany to get them quicker and to avoid import duty. Seller has now stopped communicating with me.

    Now looking for other options.
     
  20. beardyblair

    beardyblair Well-Known
    Builder

    Joined:
    Aug 1, 2016
    Messages:
    59
    Likes Received:
    72
    Bit the bullet today and ordered 3 more DQ5423MA's. Buying one was going to be £45 whereas three came to £80 delivered. I need some for my next build and its good to have spares right....

    Also began modelling the 3D printed box that will house the power supply, 4 x DQ5423MA's, wiring, Pi3 and Protoneer shield. I will post up some pics of this and make the files available once tested for fitment.

    Hoping to get this working this week!
     
    GrayUK likes this.
  21. RobertWo

    RobertWo New
    Builder

    Joined:
    Dec 13, 2016
    Messages:
    2
    Likes Received:
    0


    Lucky, Ive been waiting for 8 days for a few random parts, looks like the stuff i ordered from china is going to beat the speed of the open builds store. guess thats what happens when you sell products that arent in your posession.
     
  22. DavidCNC2017

    Builder

    Joined:
    Nov 3, 2016
    Messages:
    61
    Likes Received:
    26
    beardyblair what is the thickness of Your gantry plates?
    Thank's
     
  23. nearchos

    nearchos New
    Builder

    Joined:
    Nov 27, 2016
    Messages:
    1
    Likes Received:
    1
    If i use plywood for the plates will it be strong enough to cut again the plates in aluminum?

    Thanks in advance
     
    beardyblair likes this.
  24. beardyblair

    beardyblair Well-Known
    Builder

    Joined:
    Aug 1, 2016
    Messages:
    59
    Likes Received:
    72
    Origionally I had thought about doing the same thing. I think as JustinTime has also commented that it will be fine, be sure to use a pillar drill for the holes though as alignment and no slop will be the key to getting a good cut in the Aluminium. Mine is still not up and running but I believe shallow depth of cut will be key.

    The plates are 6.235mm I had contimplated beefing them up but ther is no need - the weak point is the bolts and wheels. But that is not an issue due to the quantity.

    Wow not cool, maybe they oversold in their recent black friday sale. Here in the UK all Openbuilds parts are sold via Ooznest and I honestly can not fault them, even when getting them to cut parts they still appear next day! Never been let down yet, top guys! But have experienced parts from China or Germany or Austria arriving before parts from here in the UK before. Crazy.
     
    Ryan Lock and Mark Carew like this.
  25. MaryD

    MaryD OpenBuilds Team

    Joined:
    Apr 13, 2016
    Messages:
    649
    Likes Received:
    639
    Agree with @beardyblair, the Parts Store was VERY VERY popular this holiday season starting with the Black Friday sale. The elves are working as fast as they can and are really doing a super job!!
     
    GrayUK and Mark Carew like this.
  26. beardyblair

    beardyblair Well-Known
    Builder

    Joined:
    Aug 1, 2016
    Messages:
    59
    Likes Received:
    72
    Finally had some time to do an update; with the run up to Christmas things are crazy at work trying to complete projects before year end. Anyhoo.....

    My drivers arrived and I managed to design a box to house them, the power supply and control hardware. I decided to make it as a stackable set of boxes, each to house a different part and to connect it via aviation style connectors. This would mean I can print it in stages and would not limit me to any sizes. After printing the first box to house the PSU I decided it needed to be larger and to add more holes to allow better airflow.

    First prototype with second below to illustrate size difference:

    [​IMG]

    Finalised base that will hold the PSU:

    [​IMG]

    And with PSU installed:

    [​IMG]

    Some of the connectors I have bought:

    [​IMG]

    I am now in the progress of making the wiring loom. This will be made from 20 AWG wires for the motors and 24 for the end stops and sensors, shrink wrapped at the ends with 4-8mm flexible sheathing. This can easily be added to over time. One six pin connector will be used for the end stops and sensors and individual 4 pins for the motors.
     
    Kyo and GrayUK like this.
  27. Anthony Bolgar

    Anthony Bolgar Journeyman
    Builder

    Joined:
    Jan 14, 2016
    Messages:
    354
    Likes Received:
    198
    I would go with 18 gauge for the motors and 20 gauge for the end stops. Those cables will be constantly flexed, thinner wire may fail prematurely. For the couple of dollars extra on the whole wiring , it does not make sense to scimp.
     
  28. beardyblair

    beardyblair Well-Known
    Builder

    Joined:
    Aug 1, 2016
    Messages:
    59
    Likes Received:
    72
    Thanks for your input. Just ordered the 18 AWG wire as per your recommendation, had hoped to wire this up today but I guess an extra day will not hurt. Its silicone multi core so will be up to the task. I will spend the time I had set aside completing the 3D design of the top section of the PSU and control boxes. Maybe post some pics later.
     
    Anthony Bolgar likes this.
  29. tcurdt

    tcurdt New
    Builder

    Joined:
    Dec 16, 2016
    Messages:
    15
    Likes Received:
    1
    Fantastic - another great build log. Kyo, has pointed me your way.
    I am currently doing my homework to build a 1000mm x 750mm machine.

    If you don't mind I would have a few questions for you:

    1. I saw got the long NEMA23 steppers. Did you go for them for the additional torque? (I am wondering if the standard size would do for my build).
    2. Do you have two separate stepper drivers for the two y-steppers? So 4 drivers or 3?
    3. Are you happy with the Pi+Protoneer setup?
    4. What spindle/router are you using?
    cheers,
    Torsten
     
  30. beardyblair

    beardyblair Well-Known
    Builder

    Joined:
    Aug 1, 2016
    Messages:
    59
    Likes Received:
    72
    Cheers for the like. Not yet sure on the cutting area of mine. Fired it up for the first time properly on Friday just before heading home and set it to 800 x 800 to be "safe". Maximum size was governed by the leadscrew sizes. I have done some testing and there is no noticeable movement anywhere. It's a really sturdy build!

    In answer to your questions:

    1. In short, yes. But remember. The torque required to move the carriages is minimal and the additional length on a larger build will not add any noticeable additional friction/drag. It is the duty of the machine that defines the torque required. When the motor is not moving it is holding and that is where you need the torque. More available torque will equal a more precise cut, especially when running fast or with harder materials.
    2. Yes....but........ I had planned to have 2 separate drivers from the start. However, after talking on these forums I decided to go for one larger driver. I ordered them all but there was a problem with delivery. So in the end I used 2.
    3. Definitely, it's a great system. Although not as well documented as I had hoped it is so easy to setup. I have set it up with end stops but not with spindle or coolant yet. Kyo has some great Youtube videos to help with config and wiring if you get stuck.
    4. Currently, Dewalt but intend to move to a dedicated CNC spindle once the machine has started to pay for itself
     

Share This Page

  1. This site uses cookies to help personalise content, tailor your experience and to keep you logged in if you register.
    By continuing to use this site, you are consenting to our use of cookies.
    Dismiss Notice