Welcome to Our Community

Some features disabled for guests. Register Today.

The Laserbox

Discussion in 'Laser Cutters' started by mytechno3d, May 23, 2015.
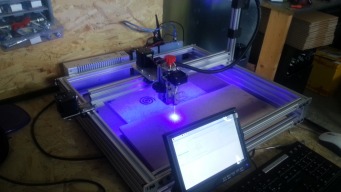
  1. mytechno3d

    mytechno3d Veteran
    Builder

    Joined:
    Dec 15, 2013
    Messages:
    108
    Likes Received:
    311
    mytechno3d published a new build:

    Read more about this build...
     
  2. Hytech2k

    Hytech2k Veteran
    Builder

    Joined:
    May 6, 2014
    Messages:
    429
    Likes Received:
    331
    You published this build at a perfect time for me, I just received my laser and driver from Jtechphotonics. I was going to add it to my small machine and run it with Mach 3 but decided to build a stand alone system pretty much like what you have here. I like what you did for the Z, small, light, and easy to adjust the focus for different thickness materials. I am going to use a Ardunio Uno or Mega with a CNC shield to run the machine.


    Also not sure if you know this already but if you use the Z pin to output the PWM for the laser strength you can vary the laser output and engrave in 8bit grayscale. It's actually pretty cool, check out Picengrave and this build over on instructables for more info http://www.instructables.com/id/CNC-Laser-for-Printing-Images-and-Engraving-Shapeo/?ALLSTEPS
     
    #2 Hytech2k, May 24, 2015
    Last edited: May 24, 2015
  3. mytechno3d

    mytechno3d Veteran
    Builder

    Joined:
    Dec 15, 2013
    Messages:
    108
    Likes Received:
    311
    Hello
    I want to add a stepper on the z axis to keep a good focus when i cut thick materials ( 8cm foam for example ) , you can also do it manually of course ...
    I try this , but i met some problems ( but i don't remember what kind of problems ..) so i move forward and use the spindle speed to adjust the laser power ( but i now that there is some problem with this method to engrave pictures correctly ..)
     
  4. Hytech2k

    Hytech2k Veteran
    Builder

    Joined:
    May 6, 2014
    Messages:
    429
    Likes Received:
    331
    I am going to add a small Nema 17 stepper on my laser slide just so i can do engravings on 3D carvings and keep the laser in focus. Like this: merging the laser gcode with the cnc mill gcode will allow shading on 3D models.

    Your build looks great, looking forward to seeing some more pictures !!

    Thanks

    Gerald
     
    Krishnakumar likes this.
  5. Mark Carew

    Mark Carew OpenBuilds Team
    Staff Member Moderator Builder Resident Builder

    Joined:
    Jun 28, 2013
    Messages:
    2,741
    Likes Received:
    2,407
    So the relief was already carved and now he is going back and burning etching it with the laser!
    Thats really cool! I wonder if you could do the same concept with injet nozzles and topographical map carvings or face profiles for instance
    Thanks for the share
     
  6. Hytech2k

    Hytech2k Veteran
    Builder

    Joined:
    May 6, 2014
    Messages:
    429
    Likes Received:
    331
    The machine he has setup has a spindle and a laser mounted to it, so he carves a shallow 3D relief first then goes back over it with the laser to shade it. The process works with grayscale depth map images. Another piece of software merges the Gcode from the 3D relief with the laser to provide shading while following the contour of the relief. And that has been done with inkjet nozzles, might try searching for one of those "How it's made" episodes, I recall them doing a piece on how topographical maps were made and if i remember correctly after it was pieced together they loaded it in a large printer and inkjet the details on...

    edit: Found it....
     
    Krishnakumar, Mark Carew and GrayUK like this.
  7. Mark Carew

    Mark Carew OpenBuilds Team
    Staff Member Moderator Builder Resident Builder

    Joined:
    Jun 28, 2013
    Messages:
    2,741
    Likes Received:
    2,407
    That is it exactly! Wow that is too cool, thanks for finding this Gerald.
    Mark
     
  8. Roger

    Roger New
    Builder

    Joined:
    Sep 17, 2014
    Messages:
    1
    Likes Received:
    0
    Hi,

    What is the part/model number for your laser?

    Thanks,

    Roger
     
  9. mytechno3d

    mytechno3d Veteran
    Builder

    Joined:
    Dec 15, 2013
    Messages:
    108
    Likes Received:
    311
    Sorry for my late answer ...
    This is a 2.8 Watt diodes from http://jtechphotonics.com/
    It s a little bit expensive , but there is no comparison with Chinese diodes and chinese drivers.
     
  10. Mark Carew

    Mark Carew OpenBuilds Team
    Staff Member Moderator Builder Resident Builder

    Joined:
    Jun 28, 2013
    Messages:
    2,741
    Likes Received:
    2,407
  11. Thurmond Moore

    Builder

    Joined:
    Dec 31, 2014
    Messages:
    23
    Likes Received:
    4
    I just purchased a NUBM44 bare head with driver assembly from here:

    XYZ Mount Modules - DTR's Laser Shop

    6.8W at full power. It will need additional control to do gray scale engraving of course.

    Not bad for $235.

    Thurmond
     
  12. lunknowl

    lunknowl New
    Builder

    Joined:
    Oct 26, 2016
    Messages:
    16
    Likes Received:
    1
    hi, i try to use your design .dxf to make one but somehow the size of bearing hole is too far away. the hole for motor is correct
     
  13. mytechno3d

    mytechno3d Veteran
    Builder

    Joined:
    Dec 15, 2013
    Messages:
    108
    Likes Received:
    311
    Hello
    I will check that , perhaps is hter a mistake on this file ( i try many version ..) .
    I look at this as soon as possible .
     
    #13 mytechno3d, Oct 31, 2016
    Last edited: Oct 31, 2016
  14. Anthony Bolgar

    Anthony Bolgar Journeyman
    Builder

    Joined:
    Jan 14, 2016
    Messages:
    354
    Likes Received:
    198
    Very nice clean build.
     
  15. lunknowl

    lunknowl New
    Builder

    Joined:
    Oct 26, 2016
    Messages:
    16
    Likes Received:
    1
    can i get the update files for this?
     
  16. Sacha Telgenhof

    Builder

    Joined:
    Oct 27, 2015
    Messages:
    10
    Likes Received:
    0
    Love your build! Just curious how you constructed that z-axis part. Is it manually adjustable? (looks like it based on the red knob). Could you share how you did that? Trying to make something similar but haven't worked out a good design yet :)
     
  17. mytechno3d

    mytechno3d Veteran
    Builder

    Joined:
    Dec 15, 2013
    Messages:
    108
    Likes Received:
    311
    Hello
    Yes , it is a manual adjustment .
    I used 2 nut plates and a little 2040 profile to make a carriage ,
    Z adjustment is make my a 8mm leadscrew and a 3D printed knob.
    I will take some pictures , so you will have more informations .
     
  18. Sacha Telgenhof

    Builder

    Joined:
    Oct 27, 2015
    Messages:
    10
    Likes Received:
    0
    Thanks! Pictures would be great to see how you did that.
     
  19. Sacha Telgenhof

    Builder

    Joined:
    Oct 27, 2015
    Messages:
    10
    Likes Received:
    0
    Sorry to bother again... Would you be able to share more info (text, pictures) on how you built the Z adjustment / stepper motor?
    Thanks!
     

Share This Page

  1. This site uses cookies to help personalise content, tailor your experience and to keep you logged in if you register.
    By continuing to use this site, you are consenting to our use of cookies.
    Dismiss Notice