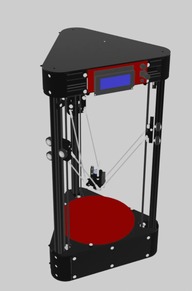
A 2023 remix of a Kossel, using parts you can actually buy and fully integrating everything into the frame
This build began when the sellotape-to-parts ratio exceeded the threshold of my old 3D printer. Having searched OpenBuilds I simply couldn't find the 'right' build - something using 2020 frame, something which actually had all the missing build instructions, something which actually had working links to the build files and something which incorporated all the required bits (usually the PSU) into the body.
So, taking a couple of existing builds as reference, I started modelling. What I ended up with is something which is 70% new - only using the K250 Delta models for the main frame parts. It's all modelled in Blender, so I'll include the source file here - it makes for the ultimate in build instructions and tweakability.
Specs:
- 0.1mm resolution
- 180mm diameter by 210mm height printable area.
- A small tweak to the rods should push this to 190mm by 200mm (more on this later).
- Height is 600mm (it fits under the desk) by 290mm x//y. This doesn't include the spool holder.
- Auto Bed levelling/calibration included!
- Hotend is a E3D Volcano,
- Extruder is E3D Titan in a Bowden configuration.
- Electronics is a cheap MKS Gen L with Reprap LCD.
- PSU is a really expensive TDK Lambda, but others will fit nicely (I've got a real thing for not burning my house down, so paid the money for a German PSU)
- Steppers are 1.8deg, but 0.9deg will work just as well
The rationale behind these major component purchases is that 'it came off my old printer'. The Volcano is the exception - splashed out here as I want to turbo-charge this printer. The 8bit processor runs the printer fine, BUT you can tell its struggling and I wouldn't want to push the print speed on this. Either put a 32bit board in, or install Klipper and a Beaglebone (still todo).
Diagonal rods are solid carbon fiber rod with ball joints installed. Very ridged, very precise, very light (very cheap). There is also a couple of carbon fibre 8mm tubes on the printer: these are purely to run the wiring top-to-bottom in a neat way.
Double-section frames across both bottom and top of the printer. These give dimensional stability to the vertical extrusion (going to 2040 verts really isn't needed), whilst at the same time creating cavities to mount the motors, electronics, PSU, extruder, etc. PSU is bottom mount, right next to its power inlet - and getting rid of the AC mains as quickly as possible. This then transmits 12v to the electronics at the top, which distributes and runs 12v back down to the heated bed. There is an easy tweak here to install an AC mains hotbed and SSR, but I'm not going there (healthy paranoia around mains). Motors, extruder and electronics then all share the top section - keeping the motor wires short and close to the drivers.
The cavities are protected by custom panels. This is important for the lower panel as you've got AC mains wiring in there (little fingers and all that). Haven't actually done these yet, but the templates are there. My plan is to use Polycarbonate and a router. You could use acrylic but you're into laser cutting here. Otherwise plywood would also suffice.
20Tooth drive gears power 6mm belts. Yeah, I can get more resolution from 16T ones: but it pushes the calculations into fractions of decimal places which cause incremental rounding errors during print calculations. By sticking to 1.8deg steppers and 20T drives this gives Z-height steps at precisely 0.1mm - which means you'll never get increasing z-height error like a lot of printers. GT2 belt tensioner springs are installed on the belts, just underneath the carriages. These take out any residual slop left over from installing the belts. Cheap solution to an annoying problem.
Hotend carriage is a custom designed job to incorporate a microswitch Z-calibration. The hotend floats on springs, so when its pushed into the bed it'll travel and engage a microswitch. This allows for accurate bed calibration using the nozzle itself. Simple and effective (just adjust your nozzle z offset to account for the microswitch travel). It incorporates dual 25mm fans. To be honest, if you have a good quality fan then one will do, but finding a high CFM 25mm fan is difficult (and pricy). My first version of this only had 1 fan (but a better z-lift mechanism) but it overheated too much. Alu heatblock is an E3D V6 SCREW mount - not the usual. Why no-one uses these is a mystery to me.
There is no part cooling fan, but I've included a couple of lugs for the future. I know a lot of people rant on about part cooling fans, but in the years I've been printing with PETG I've never used one. I just avoid massive overhangs, but I also keep the hotend temperature on the lower side and slow down for bridges. It prints out 3D Benchy just fine without one.
Wiring is straight forward: designate each of the towers as x,y,z - wire the corresponding motor and endstop. Wire the endstops into X/Y/Z-MAX ports (signal to ground), then wire the extruder microswitch into Z-MIN. Connect the extruder fans into HE1 (its reconfigured in the software).
I've included my Marlin 2.1.2 Configuration headers, so if you build one of these you can directly upload these files and have something working (just subject to running auto re-calibration).
It works...
-
-
Build Author MaherGBR, Find all builds by MaherGBR
-
- Loading...
-
Build Details
- Build License:
-
- CC - Attribution NonCommercial - CC BY NC
Reason for this Build
Wanted a Delta, couldn't find anything suitableInspired by
Kossel, K250 Openbuilds variant -
Attached Files:
-
Attached Files:


