Hello,
This build will capture my C-Beam machine going from a 500mm base to a 1000mm base.
More metal, more screws...lots of fun!
Jan 15 2020
Start with laying out the base rails. Rails have been cut to length on my saw, as square as I could get them.


These shots shows some of the extra metal work made to strengthen the uprights. All these parts were made on the 500 mm version of this machine.


Next we build up all the cross rails with all the hardware and start assembly on the main rail that supports the X and Z axis.


Jan 16 2020
Attaching the main cross rail to the sides, carefully measured and squared...


Adding the remaining cross rails to the assembly.


Once complete we tighten all the screws and then insert the Y axis rail and side support rails for the bed.


Jan 17 2020
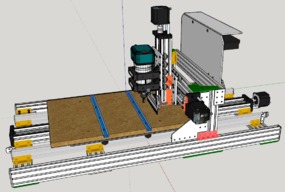
Updated the sketchup model attached to this build. Added some sketchup files containing all the plates that have been made for this model. The common X and Z axis plate is also attached. I've tried to denote the relationship of the holes on the plate with color coding for this one. See the SU file.
Jan 18-19 2020
Squared off the Y axis and X axis rails and installed the side support rails for the carriage bed. Clamped and tightened everything down.


Found a few more holes that needed tapping.

Testing the fit of the carriage.

Here is the machines new home...

A front and back view of the main controller board. Designed in KICAD, gcode produced with FLATCAM, cut with bCNC.


Installation of the electronics is next...everything mounts to the vertical plate.


Z axis carriage installed.


Jan 20-25 2020
I decided to try and re-use the old carriage bed, I added some rails for strength. If this proves to work well then I'll continue to use it otherwise we'll cut a new larger plate that spaces the wheels further apart. It runs nice and smooth so far.


Here are a couple of pics of the machine.


Re-calibration of the X and Y axis.


The almost finished machine, I still need to make some plates for some BNC plugs.

This is the jogging box that sits to the left of the laptop on the small platform. This first photo is an older one, I had to open the box to make a new wire harness for the switch inputs to GRBL - so you can see inside...another arduino Nano and some other parts.


These shots are the various menus/functions available...starting with the main menu. Selections are made with the joystick. All the design files and code for this are available in my 500mm machine build.


Here we are cutting some plates on the new machine. I need better dust/chip collection.


And the finished product.

Pretty much all that remains are wiring harnesses and the limit switches...
Feb 4 2020
I made all new wiring harnesses for the limit switches and the jogging control box. Essentially the wiring is now complete except for the indicator panel. I ran out of connector pins so this is on hold till they arrive.
Here are a number of pics of the new wiring with all connections now made via connectors attached to the main control panel.


Another view of the back:

And finally complete


As I mentioned up above I needed better dust collection so we've started a design for that. Here is the main part that mounts to the router. All kinds of examples out there that look like this type. Still have to buy some magnets and make that part that holds the brush and/or make a part that holds a heavy flexible vinyl, if I can find some...

To close out this build, here is the finished dust collection brush. A separate build log has been posted for this part. The files used to create and cut the dust shoe are included in that build log.

Enjoy
Rob
My C-Beam machine...from 500 to 1000mm base
Build in 'Other Style CNC Mills' published by RobertCanthal, Feb 9, 2020.
C-Beam machine - 1000mm base.
-
-
Build Author RobertCanthal, Find all builds by RobertCanthal
-
- Loading...
-
Build Details
- Build License:
-
- CC - Attribution - CC BY
Reason for this Build
Moving to the 1000mm base - bigger cut area. -
Attached Files:


