
Really do have to start at the beginning. I had no idea how to work with aluminum, and i couldn't find it for a price i could afford so why not 2x4s. $3 an 8 ft piece. Made several mistakes but wood is cheap and easy to machine.
Then i started on the Y carriage
I used 14" full extension drawers slides. They were $12 at Lowes. Also some 1/4" mdf that i got in a 4' by 2' sheet cause my car cant haul anything bigger. At this point i have no idea what im doing but i saw it on YouTube so im winging it.
And Honestly once I cleaned and re-lubed them with lithium grease they slide so smooth.
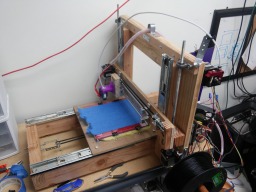
Meanwhile this stuff is giving me a headache.
![[IMG]](proxy.php?image=http%3A%2F%2Fi.imgur.com%2FBsOHlCu.jpg&hash=13a8709a1d8208fcf96e41fb079b25d3)
I stalk the RepRap - RepRapWiki forums and YouTube to understand what im even seeing here. The Arduino Mega, and Ramps board, and E3D styled hotend are the absolute least expensive options i can find so that's what i get. i especially order spares as im sure im letting out the magic smoke on several components as i go. The power supply one of many is a salvage job from one of my many carcasses of computers long dead.
So much learning to do!
Back on the Mechanical Side i stumble quite a bit on the Belt driven system.
I end up using gt2-20 toothed gear and toothed idler.
Spacing is not something im thinking about yet so i make it up as i go
This little monster im kind of proud of
Its a toothed gear on a brass bushing. TOTAL FAILURE!
Clicked like one of those silent hill nurses.
But round 2 solved those issues
The metal body of the idler/tensioner is one of those steeltec building toys i had as a kid. im still avoiding any metal machining as im not confident in what im doing at all.
The toothed idler solved the clicking that the brass bushing had.
Happy little couple.
By the way metric screws in the US are a terrible hassle.
I recut my own using #6 electrician screws which become M3 screws after some adjusting with a tap/die set.
Time to start thinking about the Z- Axis
Bolted the verticals in to the base and mounted the motors. I've already made a lot of mistakes and still not thinking about spacing.
OK Cross piece time:
motors are already dismounted. things had to move.
and here is another thing i got from YouTube.
![[IMG]](proxy.php?image=http%3A%2F%2Fi.imgur.com%2FrpGOo5m.jpg&hash=5e0ef6346fd51528b42cc0815a0de4b0)
I honestly cant find the video anymore but a guy figured out DIN rail which is used inside of electrical panels for clipping breakers onto is exactly 35mm and very accurate.
![[IMG]](proxy.php?image=http%3A%2F%2Fi.imgur.com%2F1Z9PTpz.jpg&hash=0c70a4977757b8ea4e770d79ec21927a)
Using these ridiculously cheap v-grooved bearings as wheels to run on the DIN rail.
![[IMG]](proxy.php?image=http%3A%2F%2Fi.imgur.com%2FBRatG6f.jpg&hash=325009f2011dab5f89d770fa5c9e9411)
Now i have no idea how im going to mount the bearings onto a panel of wood so that it lasts longer than a day so i opt to do my very first metal work.
And here it is an electrical box cover plate. 50 cents from the homedepot.
![[IMG]](proxy.php?image=http%3A%2F%2Fi.imgur.com%2F9HDdb2D.jpg&hash=98140216116c4dd54bb0dba940bec4f4)
and the business side:
![[IMG]](proxy.php?image=http%3A%2F%2Fi.imgur.com%2FMKIiXAA.jpg&hash=696fb9aa3670a83cfc7e35e0de8d10a6)
So this is the basic idea:
the bearings are mounted on the plate allowing 35mm betwix their grooves.
![[IMG]](proxy.php?image=http%3A%2F%2Fi.imgur.com%2FJBndibx.jpg&hash=a7bf46b454431fe17beefd65d20af2ba)
surprisingly this works a dream. but stay tuned
I begin thinking about how the heck to mount the hot end. So you might be thinking what happened to the Z- axis? Yeah my brain is not thinking things thru in what i would today call the right order were just thought experimenting everywhere.
![[IMG]](proxy.php?image=http%3A%2F%2Fi.imgur.com%2FNAwy6Zk.jpg&hash=5d33ce89f50f8ed8afded1fcbf26dec2)
![[IMG]](proxy.php?image=http%3A%2F%2Fi.imgur.com%2FRN0BNX8.jpg&hash=397325cb5bde19d3c97420f150d74d33)
Little bend cut a groove. feelin good.
Then i start making more moves towards getting that hotend on there.
![[IMG]](proxy.php?image=http%3A%2F%2Fi.imgur.com%2FVUhxvUx.jpg&hash=e2fa09f52e92c333f90732ab5f76f60f)
Its funny that proximity sensor has never been used. but by god its there. lol
Starting to sort out my X-axis
keep in mind i've not touched the Z
![[IMG]](proxy.php?image=http%3A%2F%2Fi.imgur.com%2FiqZVgcf.jpg&hash=98cb0294a6170c9e90c2a38c423212ad)
Little loop on the left
![[IMG]](proxy.php?image=http%3A%2F%2Fi.imgur.com%2F5Ol10XN.jpg&hash=c764eabba9caeab2082cd5f0f45f8d7e)
and my second idler/tensioner. basically half the size and much easier to assemble cause improving is what its all about.
![[IMG]](proxy.php?image=http%3A%2F%2Fi.imgur.com%2FN8GRp9Q.jpg&hash=07a9c4cb78ecb897dadd8e74c6744bac)
And the X is assembled.
![[IMG]](proxy.php?image=http%3A%2F%2Fi.imgur.com%2FXMqmDG4.jpg&hash=133729eadb247ffa6015217050f5f572)
Belt mounted to the print head carriage
![[IMG]](proxy.php?image=http%3A%2F%2Fi.imgur.com%2FxX8APqw.jpg&hash=96b6c5be01e7a628dc78b28f8e3d081e)
Now so far i haven't cursed or anything im kinda cruising on by blissful in my ignorance.
and..
![[IMG]](proxy.php?image=http%3A%2F%2Fi.imgur.com%2FyFNI20U.jpg&hash=badf0711f872ca57e6400cfb3e38d695)
EPIC FAIL! the weight of the whole thing cracks the vertical arms in a sad and crunchy way.
few days of sadness and moping and i get to adapting
so far ive been using pine cause its literally the cheapest of the cheap. but it is also technically a softwood. a bat made of it would still hurt but its not strong enough
so i get to reinforcing it with some strong OAK.
![[IMG]](proxy.php?image=http%3A%2F%2Fi.imgur.com%2FpWA2ShM.jpg&hash=e0d77552396d8b7dc65ed2a4f57d213d)
![[IMG]](proxy.php?image=http%3A%2F%2Fi.imgur.com%2FR7peiu2.jpg&hash=5dae4b48aab809b630457e9348b53e49)
Finally getting the Z-Axis sorted too.
![[IMG]](proxy.php?image=http%3A%2F%2Fi.imgur.com%2FDGDLb9Q.jpg&hash=edfdbe2dd0411f02aca01c34fc00be2e)
So Much Glue! So Many Screws!
But shes holding now!
![[IMG]](proxy.php?image=http%3A%2F%2Fi.imgur.com%2Fj4jIRT6.jpg&hash=b6a0dcd0cb8d1737d2a1811636d19141)
The body is built at this point. software wiring and a million years of tuning and she prints a pickachu
![[IMG]](proxy.php?image=http%3A%2F%2Fi.imgur.com%2FoSqGw88.jpg&hash=cb66574a8c98daa7e1330c5b0e7cb85d)
![[IMG]](proxy.php?image=http%3A%2F%2Fi.imgur.com%2F3DP4H0J.jpg&hash=34560c83f243343c991cdeb99f1fd0fb)
A lot of Pikachus![[IMG]](proxy.php?image=http%3A%2F%2Fi.imgur.com%2FwWu4Mwh.jpg&hash=5276edc63a5d612cfe5d0c56838685f4)
Roberta Clementine
Build in 'Cartesian Style Bots' published by Jose A. Molina, Jun 9, 2016.
The Roberta Clementine a proof of concept and progenitor to the series of printers I will be calling the Clementine Sisters. The printer is named after Pittsburgh Pirates baseball player Roberto Clemente. Although it is more accurate to say the printer is named after the school I work for which is named after Clemente the Roberto Clemente Charter School. http://www.myrccs.com Roberta is the first and not really built to last but instead built to test ideas and to produce the parts for successors
-
-
Build Author Jose A. Molina, Find all builds by Jose A. Molina
-
- Loading...
-
Build Details
- Build License:
-
- CC - Attribution Share Alike - CC BY SA
Reason for this Build
So I work as an IT Director for a school. I have been drooling over 3D printers for a while but since i barely have enough resources to keep our laptops and desktops operating I was not keen on diverting funds from other programs. I decided to build my own printer for a collection of reasons.
1. I was not able to spend the one time funds needed to outright buy a 3D printer.
2. I wanted to fully understand the entire process and mechanism for my own and as a way of preparing myself to service and operate any 3D printer the school might acquire.
3. I have a particularly non-linear way of learning which kind of takes much longer then most but which I believe goes deeper towards understanding what is happening.
4. I have watched as state testing mandated by federal laws has whittled down resources for any departments not in direct benefit to the “TEST”. Student morale is lower then I've ever seen it. I was completely convinced that this would light the kids up, and get them to enjoy school a little more. In this I was completely 100% correct. The kids go out of their way to find out what news there is on the printer and the wheels in their heads are loudly spinning.Inspired by
The Prusa I3, and the WolfStrap
![[IMG]](proxy.php?image=http%3A%2F%2Fi.imgur.com%2FIydHV0Y.jpg&hash=3a40b1d5a2f5f4c6e7d88407b3a4cf08)
![[IMG]](proxy.php?image=http%3A%2F%2Fi.imgur.com%2FyE0wOFJ.jpg&hash=e16e909753d3b3e65d580e9ca9274a62)
![[IMG]](proxy.php?image=http%3A%2F%2Fi.imgur.com%2FZOeic4Q.jpg&hash=2bdea5d5241ce25f63db61188a17cb10)
![[IMG]](proxy.php?image=http%3A%2F%2Fi.imgur.com%2FUeDXjpt.jpg&hash=d227da663f6418c794509c2aff5bf1a8)
![[IMG]](proxy.php?image=http%3A%2F%2Fi.imgur.com%2Fz9TlbzY.jpg&hash=8af3f21bc7f4fbdbcbc131c1d4590213)
![[IMG]](proxy.php?image=http%3A%2F%2Fi.imgur.com%2FDGHON3W.jpg&hash=fbb923a3ff62934c18b4d1b4cd181301)
![[IMG]](proxy.php?image=http%3A%2F%2Fi.imgur.com%2FZvTeYi1.jpg&hash=12851da92357f240dfd81ae64fb9d644)
![[IMG]](proxy.php?image=http%3A%2F%2Fi.imgur.com%2FafdOXqH.jpg&hash=e635908141ec8f78b800de4382b5444f)
![[IMG]](proxy.php?image=http%3A%2F%2Fi.imgur.com%2FKyF2jvZ.jpg&hash=c9ba21eb9584eba63a123c0a68e9f94d)
![[IMG]](proxy.php?image=http%3A%2F%2Fi.imgur.com%2FG9ju92n.jpg&hash=d924f300f5b9c141cfaae0435bffc0a4)
![[IMG]](proxy.php?image=http%3A%2F%2Fi.imgur.com%2FdmPwTaj.jpg&hash=1e9d44e16bb28da762ef405699c3de6a)
![[IMG]](proxy.php?image=http%3A%2F%2Fi.imgur.com%2FFNSRhkb.jpg&hash=448a27cd8e7c8a9eb8301dc64ef08eeb)
![[IMG]](proxy.php?image=http%3A%2F%2Fi.imgur.com%2FqgeXUSI.jpg&hash=75049d0bfb4c9e81a0363e7929725a85)
![[IMG]](proxy.php?image=http%3A%2F%2Fi.imgur.com%2F0dRoIXC.jpg&hash=280452dc098a1d4ba87894cb7596608b)
![[IMG]](proxy.php?image=http%3A%2F%2Fi.imgur.com%2FxLPPJzZ.jpg&hash=65759fcc56d692dec99587ea05373d57)
