
Update 1/9/18:Got the assembly put together. Waiting until I have a break in my other projects to get this back on and running. The old z-axis looks ridiculous next to this one though!


Original Post: This is not a complete machine build, but I wanted to share the major revamp of my shapeoko 2 and hopefully get some feedback on this design.

I have been having a lot of issues with my shapeoko 2's Z-axis having a lot of flex, binding up, and skipping steps. The image above is an example of where the machine lost steps going up and the router plunged too deep. I finally got fed up with trying to fine tune the axis to fix this and decided I was going to build a new Z-axis similar to the one built by beaver cnc for the shapeoko 3.
Here is a twst cut with my laser cutter to see if everything will line up. So far so good!

This design uses two MGN12 linear rails and a SFU1204 ball screw propelled by a Nema 23 motor. The linear rails are much shorter than the ball screw so they are mounted on 1"x1" solid aluminum square stock, which is where motor plate is also mounted to. This will make the z-axis very rigid, more accurate, and a lot stronger than the stock setup. I added mounting holes to allow me to run shapeoko 3 motor brackets for bigger routers in the future. I don't intend on getting a bigger one right away, but hopefully I can make this machine rigid enough that a DW660 is the limiting factor. Everything from the red X-carriage plate forward will be all new.

All of the plates are currently being machined out of 1/4" aluminum and should be assembled soon.
Old revision: I was intending on mounting the new motor to the back of the plate and running a belt to the pulley. This design would make the machine easier to store, and be less top heavy, but I was concerned about the belt slipping. I still left the mounting holes for this so I still might try this at some point if I think the overall height is a concern.

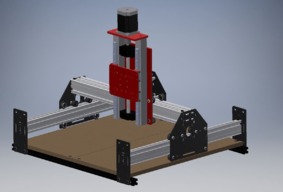
Shapeoko 2 Z-Axis Upgrade
Build in 'Cartesian Style CNC' published by joetemus, Jan 9, 2019.
This is a major redesign to the Z-axis of an otherwise stock Shapeoko 2.
-
-
Build Author joetemus, Find all builds by joetemus
-
- Loading...
