
I bought my first CNC back in 2015. The X-Carve was a good little machine, but I wanted something bigger! So I designed my own machine and began construction:

This is the 8020 parts along with the linear rails and ball screws.

I built a wooden table with casters for the machine to sit on. This photo shows how the Y axis linear rails are mounted.

The X axis rails mounted to the gantry back.

The Z axis mounting plate attached to the X axis rails.

The X axis ballscrew mounted.

The gantry sides mounted to the Y axis and the X axis mounted to the gantry. The Daedal slide that I used for the Z axis was something that I had bought years before. You can still find these on eBay.

Starting to tinker with the Y axis motors. The initial design had stepper motors on all the axes. But I was not happy with the speed or the noise they produced. I couldn't find servo motors that were reasonably priced and I moved around this time so the build stalled for almost 2 years.

I finally came across these servo motors from Teknic. They were exactly what I needed, they are AC servos with an integrated amplifier and controller. All you have to do is feed it DC power and step/direction signals. They are much faster, quieter and more powerful than stepper motors. This photo shows one of the Y axis motors with its mounting plate and a shaft extension to connect it to the screw.

The Z axis motor. It was a drop-in replacement for the Nema 23 stepper motor that I had initially installed.

The X axis motor. The hole in the gantry side is about 3" in diameter in order to fit the stepper motor through it. The pilot diameter of the servo was just a hair smaller than that, so I didn't have to change anything in order to mount the servo.

The X and Y servo motors are Nema 34's.

All the servo motors installed as well as the X and Y drag chain.

The spindle mounting plate.

With the DeWalt router and Z drag chain installed.

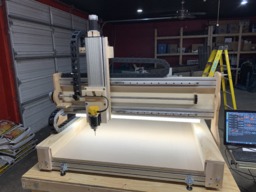
Almost complete! This photo shows the MDF table top and all the wiring cleaned up. Here you can also see where I installed leveling feet, these are on the front and back.

I installed a 4x4 receptacle on the back of the Z mounting plate for the light and the router. I wired each outlet on a separate circuit, one is switched and the other is unswitched. The switched side is for the router and will be wired into the controller.

With the wiring cleaned up.

Back of the Z axis.

The Y axis motors.

Instead of attaching the MDF table top directly to the 80/20 I cut MDF strips and bolted these down using T-nuts. Then I'll just screw the top board into these.

The table top with holes drilled and threaded inserts installed. The inserts are on about a 3" grid and have 1/4-20 internal threads.

Moved the controller over from the X-Carve. This control was an upgraded setup that I had connected to it. Now I guess I'll have to find something new for the X-Carve, the original Grbl control just doesn't do it for me.


I just had to make a cool name plate for it...

Control wiring cleaned up.

Decided to throw some stain on some of the wood parts.


Machine upgrade time! Just got a new jog handwheel, spindle and VFD. I went with a 2.2kW air cooled 24,000 RPM spindle.
The VFD came with a manual... just not in English. After a quick Google search, I was able to find it in English though. The manual is MUST, there is just no way to tweak the parameters without knowing what they do. I had to do a little re-wiring though as it is 220v.
I haven't installed the jog handwheel yet. On a machine this size the remote pendant is really nice to have.


With the new spindle installed. I love it so far! It is so much quieter than the router and doesn't have any brushes to wear out. Plus, I'll be able to control the speed now from the CNC.
The Growler
Build in 'Cartesian Style CNC' published by Scott Martinez, Feb 27, 2019.
This machine is a heavy duty, moving gantry style CNC router. It uses Teknic ClearPath servo motors driving ballscrews and linear rails. The machine has 36" x 48" x 19" of travel with about 7" of clearance below the gantry.
-
-
Build Author Scott Martinez, Find all builds by Scott Martinez
-
- Loading...
-
Build Details
- Build License:
-
- CC - Attribution - CC BY
Reason for this Build
I needed a machine that was bigger and more rigid than the X-Carve that i owned. -
Attached Files: