Welcome to Our Community

Some features disabled for guests. Register Today.

IndieLC

Discussion in '3D printers' started by Indieflow, Apr 11, 2015.
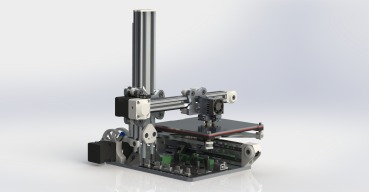
  1. Indieflow

    Indieflow Journeyman
    Builder

    Joined:
    Mar 28, 2014
    Messages:
    127
    Likes Received:
    133
    Indieflow published a new build:

    Read more about this build...
     
  2. blindflight

    blindflight Well-Known
    Staff Member Builder Resident Builder

    Joined:
    Sep 19, 2013
    Messages:
    53
    Likes Received:
    56
    Pretty slick build !!
     
  3. maxoutny

    maxoutny New
    Builder

    Joined:
    Jan 13, 2014
    Messages:
    4
    Likes Received:
    1
    Is they are any way you can release source files?
     
    Carl Feniak likes this.
  4. Keith Davis

    Keith Davis Veteran
    Builder

    Joined:
    Dec 11, 2013
    Messages:
    506
    Likes Received:
    393
    I'm curious what control board you are using. Looks compact but I don't recognize it.
     
  5. brigham valdez

    Builder

    Joined:
    Jan 22, 2014
    Messages:
    4
    Likes Received:
    1
    you can use ramps or anything that runs marlin.
     
  6. brigham valdez

    Builder

    Joined:
    Jan 22, 2014
    Messages:
    4
    Likes Received:
    1
    yo indie is it possible to get the solidworks files for this?
     
    Bensaad likes this.
  7. dditzler

    dditzler New
    Builder

    Joined:
    Jan 29, 2014
    Messages:
    3
    Likes Received:
    1
    Very nice. I like the design. Thank you!
     
  8. A J

    A J New
    Builder

    Joined:
    Mar 24, 2015
    Messages:
    7
    Likes Received:
    0
    Hey indie, pretty nice.

    Do you mind sharing overall cost for the build. Thinking on doing something similar but would like to get myself calibrated cost wise. Thanks
     
  9. Indieflow

    Indieflow Journeyman
    Builder

    Joined:
    Mar 28, 2014
    Messages:
    127
    Likes Received:
    133
    Thanks very much! :thumbsup:

    Currently I'm not ready to release the source files I'm afraid (still tweaking), though if you want to change a part slightly let me know!

    I'm using a Minitronics due to its size and minimal features, though any electronics could be used!

    Thanks :thumbsup:

    Unfortunately I didn't log all my costings when I made my own though I would say around £350 upwards depending on quality of parts!
     
  10. Vasanth

    Vasanth New
    Builder

    Joined:
    Mar 13, 2014
    Messages:
    2
    Likes Received:
    0
    what is the tool you used for simulation?
     
  11. Stew Skinner

    Builder

    Joined:
    Apr 12, 2014
    Messages:
    8
    Likes Received:
    1
    How are you able to make sure that the free end of the x-arm doesn't sag or bounce? I like the build style, but worry about print accuracy the further down the rail the head travels.
    Looks awesome :)

    Cheers,
    Stew
     
  12. Keith Davis

    Keith Davis Veteran
    Builder

    Joined:
    Dec 11, 2013
    Messages:
    506
    Likes Received:
    393
    I'm working on a similar "one arm" design with a 8x8 build area. I mounted a dial indicator to the back side of the x axis arm out to the right side of the build bed and set it so the dial depressed half a revolution all along the y axis. I then printed (without filament) a first layer of an object the full size of the bed with 90 and 45 degree angle settings. Bounce or sag should show up on the needle as vibration. I tried it at 30, 100 and 150mm / sec, with a bowden extruder and a direct drive. The 20x20 rail showed no vibration with the bowden or the direct drive. I was contemplating going with a 20x40 x arm but I think the 20x20 is rigid enough.
     
    crispin likes this.
  13. Indieflow

    Indieflow Journeyman
    Builder

    Joined:
    Mar 28, 2014
    Messages:
    127
    Likes Received:
    133
    Hi Stew,

    When I designed the printer I carried out a lot of experimenting with the X axis and specifically positioned the X axis stepper and Extruder stepper to counter balance the length of the X axis!

    Additionally the Bowden system Hot end weighs virtually nothing in comparison to a Direct Drive system. If you look on my Google+ account you can see plenty of pictures of the print quality I'm getting!

    I hope this answers your concern, Simon
     
  14. Alvis

    Alvis New
    Builder

    Joined:
    Aug 7, 2014
    Messages:
    1
    Likes Received:
    0
    How much Eccentric Spacer you use and which size?
     
  15. TomH

    TomH Well-Known
    Builder

    Joined:
    Mar 10, 2015
    Messages:
    108
    Likes Received:
    11
  16. andrew

    andrew New
    Builder

    Joined:
    Mar 16, 2014
    Messages:
    47
    Likes Received:
    18
    Minimalism is at the heart engineering. I'm not sure I've seen the sweet spot for this type of machine yet, but I like this build. I'm not convinced the bowden tube can handle flexable filaments. That's a bit of a drawback. Nice build though, I'm gonna have to do something like this soon.
     
  17. Keith Davis

    Keith Davis Veteran
    Builder

    Joined:
    Dec 11, 2013
    Messages:
    506
    Likes Received:
    393
    Show me a printer or extruder manufacturer that claims boldly that they can print flexible filament with a bowden configuration at anything above crawl speed. I've not seen one.
     
  18. andrew

    andrew New
    Builder

    Joined:
    Mar 16, 2014
    Messages:
    47
    Likes Received:
    18
    Yeah, I wasn't speaking specifically about this build. Just the bowden design in general. That's the main drawback I would weigh against its advantages. Probably worth it though.
     
  19. Indieflow

    Indieflow Journeyman
    Builder

    Joined:
    Mar 28, 2014
    Messages:
    127
    Likes Received:
    133
    The build uses 4x Eccentric Spacers which can be either the 6mm or 1/4" variant, you just need to make sure you use the same size Aluminium Spacers!

    The IndieLC looks almost like it's little brother :thumbsup: though god knows how they make it so cheap!

    I am currently in the process of re-designing the Hot End mounting system to hold the new RepRapPro Duel Colour Hot End.

    Must admit I have never experimented with flexible filaments! Maybe a minimal length Bowden Tube could be used or a Geared Direct Drive Extruder using a Nema 14 Stepper could be mounted! I hope you consider the challenge of experimenting and leaving some feedback?
     
  20. Indieflow

    Indieflow Journeyman
    Builder

    Joined:
    Mar 28, 2014
    Messages:
    127
    Likes Received:
    133
    Just updated the build with a Mounting Diagram/BOM for the Y-Axis. What is everyones thoughts towards this possibly being the best way forward?
     
  21. TomH

    TomH Well-Known
    Builder

    Joined:
    Mar 10, 2015
    Messages:
    108
    Likes Received:
    11
    adamcooks found another that looks even closer http://www.openbuilds.com/threads/h-bot-corexy-cube-with-fixed-build-plate.1528/page-2#post-16816 (https://www.kickstarter.com/projects/deezmaker/bukito-portable-3d-printer-take-it-everywhere).

    Supposedly semi-flexible filaments like SemiFlex from NinjaFlex (http://www.ninjaflex3d.com/products/ninjaflex-filaments/) will work with Bowden - I will probably try some with my printer when I complete the build. To support other extrusion alternatives I am also still investigating a compact direct drive geared extruder or a cable driven extruder for a fourth extruder option.
     
  22. TomH

    TomH Well-Known
    Builder

    Joined:
    Mar 10, 2015
    Messages:
    108
    Likes Received:
    11

    Definitely appreciate the minimalistic approach as well...
     
  23. Indieflow

    Indieflow Journeyman
    Builder

    Joined:
    Mar 28, 2014
    Messages:
    127
    Likes Received:
    133
    For me it is the ability to split the machine down to the key components (3 axis) for transporting and minimal structure versus maximum build area.

    The new SemiFlex by NinjaFlex sounds like it works with Bowden Extruders from what I've been reading! I may have to give some a try!
     
  24. Indieflow

    Indieflow Journeyman
    Builder

    Joined:
    Mar 28, 2014
    Messages:
    127
    Likes Received:
    133
    Mounting diagrams, BOM and a few minor tweaks updated :thumbsup:

    Feedback is greatly appreciated.
     
  25. Yann Rapin

    Builder

    Joined:
    May 30, 2015
    Messages:
    1
    Likes Received:
    0
    This built talks to me ! I like the minimal designs like this. And your diagrams are really clear and clean. Maybe I'll try to make it but since I have no built to my curriculum for now, I'll start first with a small E-Waste 3D Printer using CDs and Floppy drives mechanisms saw on Instructables. Seem a good and cheap start to me ! :)
     
  26. Indieflow

    Indieflow Journeyman
    Builder

    Joined:
    Mar 28, 2014
    Messages:
    127
    Likes Received:
    133
    Thanks for the comments :thumbsup:
     
  27. dawie22

    dawie22 New
    Builder

    Joined:
    Aug 29, 2014
    Messages:
    19
    Likes Received:
    1
  28. Indieflow

    Indieflow Journeyman
    Builder

    Joined:
    Mar 28, 2014
    Messages:
    127
    Likes Received:
    133
    The current X-Carriage 3d Printed part needs a slight adjustment from communications with RepRapPro. I will upload the altered part tomorrow. Also additional Hotend carriages are inbound for those that wish to use alternatives.
     
  29. dawie22

    dawie22 New
    Builder

    Joined:
    Aug 29, 2014
    Messages:
    19
    Likes Received:
    1
    Apologies for my un-knowing, one assumes you mean the "Bowden Hotend" (referring to the technical drawings) when you mention the X-Carriage?

    P.s, the tech drawings - Fantastic! brings back memories hehe.

    Edit: yep Im the dumb a**. they are in the tech drawings, Labelled 3
     
  30. Indieflow

    Indieflow Journeyman
    Builder

    Joined:
    Mar 28, 2014
    Messages:
    127
    Likes Received:
    133
    Not at all! Glad the tech drawings are useful :)
     

Share This Page

  1. This site uses cookies to help personalise content, tailor your experience and to keep you logged in if you register.
    By continuing to use this site, you are consenting to our use of cookies.
    Dismiss Notice