Welcome to Our Community

Some features disabled for guests. Register Today.

Stinger Laser

Discussion in 'Laser Cutters' started by Kyo, Apr 9, 2017.
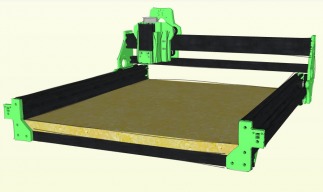
  1. Kyo

    Kyo Veteran
    Staff Member Builder Resident Builder

    Joined:
    Feb 27, 2014
    Messages:
    673
    Likes Received:
    699
    Kyo published a new build:

    Read more about this build...
     
  2. Anthony Bolgar

    Anthony Bolgar Journeyman
    Builder

    Joined:
    Jan 14, 2016
    Messages:
    354
    Likes Received:
    198
    Nice little build. I have built something similair.
     
  3. Kyo

    Kyo Veteran
    Staff Member Builder Resident Builder

    Joined:
    Feb 27, 2014
    Messages:
    673
    Likes Received:
    699
    Sorry for the slow reply, been busy digging the foundation for one of my more ambitious projects and have been away from the forums / email as of late. Thanks, it has been a very fun tool to have on hand. It has been doing a number of side projects the last few weeks. I never would have imaged how useful a laser is. I am really looking forward to stepping up to a CO2 laser at some point.
     
  4. Anthony Bolgar

    Anthony Bolgar Journeyman
    Builder

    Joined:
    Jan 14, 2016
    Messages:
    354
    Likes Received:
    198
    I love my lasers, in addition to a diode engraver I have 3 CO2 lasers. Can't imagine life without them.
     
  5. Robert Kirkpatrick

    Builder

    Joined:
    Jan 3, 2017
    Messages:
    32
    Likes Received:
    7
    Any videos of it cutting?
     
  6. Kyo

    Kyo Veteran
    Staff Member Builder Resident Builder

    Joined:
    Feb 27, 2014
    Messages:
    673
    Likes Received:
    699
    I have a few videos. Just need to find the time to edit and upload them to youtube. As soon as I do I will make sure to post a link here.
     
  7. Robert Kirkpatrick

    Builder

    Joined:
    Jan 3, 2017
    Messages:
    32
    Likes Received:
    7
    Thanks, looking forward to it...
     
  8. Sacha Telgenhof

    Builder

    Joined:
    Oct 27, 2015
    Messages:
    10
    Likes Received:
    0
    Hi,

    I am in the process of building your Stinger Laser as well, however have a question related to the Z-Axis. How is the lead screw seated at the bottom? The front X-axis has a pocket hole for what it looks like a bearing or something. What did you use for that? Unfortunately your BOM doesn't mention any of that.

    BTW Great build!
     
  9. Kyo

    Kyo Veteran
    Staff Member Builder Resident Builder

    Joined:
    Feb 27, 2014
    Messages:
    673
    Likes Received:
    699
    Bearing and Lock collar same as used on a c-beam linear actuator. Here is a Z/X axis assembly animation and demo video that shows how it all goes together and works.


  10. Sacha Telgenhof

    Builder

    Joined:
    Oct 27, 2015
    Messages:
    10
    Likes Received:
    0
    Super! Thanks for the info. Currently I am gathering all the parts and hopefully early next year can start the assembly :)
     
  11. Giarc

    Giarc OpenBuilds Team
    Staff Member Moderator Builder Resident Builder

    Joined:
    Jan 24, 2015
    Messages:
    2,892
    Likes Received:
    1,610
    D*** you Kyo! :) I was just getting ready to design my z axis for my laser cutter and this thread pops up again. I really can't improve it, so you sucked the fun out of me designing my own. ;):thumbsup: I wish I would have seen it sooner, I would have it printed by now. I was going to do a similar mount, but mill the part that comes into contact with the v-slot out of HDPE and attach it to 3D printed parts. I guess I don't need to. Is that stepper from an Epson printer/scanner? I just ripped apart an old one and found a similar stepper. I think it was an EM-600. If so, how many steps per revolution is it? I wanted a light-weight stepper since it will be getting moved about fast and I wanted to keep the weight of the gantry down.
     
    #11 Giarc, Dec 17, 2017
    Last edited: Dec 17, 2017
    Kyo and Sacha Telgenhof like this.
  12. Sacha Telgenhof

    Builder

    Joined:
    Oct 27, 2015
    Messages:
    10
    Likes Received:
    0
    For the Z-Axis stepper a round 0.9deg Thin Nema 14 Stepper Motor Bipolar 0.5A 7Ncm/10oz.in is used. You can see also in the parts list :)
     
  13. Giarc

    Giarc OpenBuilds Team
    Staff Member Moderator Builder Resident Builder

    Joined:
    Jan 24, 2015
    Messages:
    2,892
    Likes Received:
    1,610
    Thanks
     
    Sacha Telgenhof likes this.
  14. Kyo

    Kyo Veteran
    Staff Member Builder Resident Builder

    Joined:
    Feb 27, 2014
    Messages:
    673
    Likes Received:
    699
    @Giarc haha :D Yeah the printed slide worked out way better then I thought it would. On a laser system the z-axis does not move very far and not very often. It helps make a compact sub assembly with a very low total weight to move around. Sacha is correct, The stepper I used is a Nema 14 I grabbed from amazon "Here" I had it laying around from a light weight direct drive extruder I built a while back. I have used nema steppers (14 and 17) from printers before. I do not recall running across a em-300 myself however. The little I can find online about it. It does seem to be a 4 wire bipolar stepper of similar form factor to the nema 14 I used. So it very well may work. No harm in giving it a try if it mounts up. :thumbsup: Figuring out if it is a 1.8 or 0.9 should not be to hard once it is moving the z-axis and the steps per can be adjusted accordingly.
     
  15. Giarc

    Giarc OpenBuilds Team
    Staff Member Moderator Builder Resident Builder

    Joined:
    Jan 24, 2015
    Messages:
    2,892
    Likes Received:
    1,610
    Thanks for the info. I found that it is a 7.5 degree stepper, byt it is really small. I think i will just buy a nema 14 like you used. I have a scrap piece of 3/16-18 threaded rod that fits nicely in my 5mm to 8mm shaft couplers i bought when I built my eggbot and the two 8mm pillow block bearings I had left over from my cnc build.

    It is nice to use all the leftover parts for a new build. I even found Tap Plastics sells acrylic cut offs for $1.50/ pound. I needed about 144 square inches and a 12x12 piece was $14. The 11x14 "scrap" piece I bought along with several other pieces (total of about 4 square feet of 1/4 inch came to less than $7. Weird. :thumbsup:
     
  16. DeltaCon

    DeltaCon New
    Builder

    Joined:
    Mar 27, 2017
    Messages:
    14
    Likes Received:
    2
    Hi, I am interested in this build. Do you have some pictures or footage of the running machine? Would you say it suffices for lasering? I guess it is a lot more stable than an Acro or Eleksmaker frame, that's why I am interested.I I want to have a machine dedicated to laser engraving, and am considering enlarging your plan to about 1000 to 750mm, with the portal being the long side (just because that is easier to fit in my small workshop. My guess is that the 40x40 X-axis is more than adequate bridging 1000mm. Wouldn't you? I think I will have the plates waterjetted out of 6mm alu. Did you interconnect the 20x20 to the 60x20 rails some how?
     
  17. DeltaCon

    DeltaCon New
    Builder

    Joined:
    Mar 27, 2017
    Messages:
    14
    Likes Received:
    2
    I am expecting the first parts for this build next week. I am planning on a 1000 x 750 ish frame. I will do the X-axis on the long side of the machine. That fits better in my wrkshop. Because this machine looks to be a lot more stable than any Acro or Eleksmaker frame, I think that will be no problem. I think I will start out with the printable parts. But I am considering alu plates as well. I will decide on the laser module and controller when I get the frame build done. I think I will go with Lightburn software, or should I certainly try out any other software first?
     
  18. DeltaCon

    DeltaCon New
    Builder

    Joined:
    Mar 27, 2017
    Messages:
    14
    Likes Received:
    2
    I made a list of the needed screws and nuts for this build, if anyone is interested:
    4 Y axis endplates
    3 Lowprofile screw M5x20 pack of 25 For tapped extrusions
    2 Lowprofile screw M5x10 pack of 25 For Tee nuts
    2 Tee nuts pack of 25

    2 Y Axis sideplates
    2 Lowprofile screw M5x30 pack of 25 for upper wheels
    2 9mm spacers pack of 5 for upper wheels
    2 Lowprofile screw M5x25 pack of 25 for bottom wheels
    2 6mm spacers pack of 5 for bottom wheels
    2 Buttonhead screw M3x10 pack of 10 for bottom wheel bar
    4 Buttonhead screw M3x12 pack of 10 for motor
    4 Lowprofile screw M5x20 pack of 25 For tapped extrusions

    1 Z Axis carriage
    4 Buttonhead screw M3x12 pack of 10 for motor
    2 Lowprofile screw M5x65 pack of 10 for upper wheels
    2 9mm spacers pack of 5 for upper wheels
    4 6mm spacers pack of 5 for upper wheels
    2 Lowprofile screw M5x50 pack of 10 for bottom wheels
    2 9mm spacers pack of 5 for bottom wheels
    4 Buttonhead screw M3x10 pack of 10 for bottom wheel bar
    4 Lowprofile screw M5x15 pack of 25 for Z-axis guides
    4 Lowprofile screw M5x10 pack of 25 for Z-axis top and bottom cover
    2 Buttonhead screw M3x10 pack of 10 for Z-motor

    1 Frame parts
    8 Lowprofile screw M5x10 pack of 25 for 90 degree corners
    18 Tee nuts pack of 25 for Tee nuts

    Totalised it brings me to this:

    Total Screws
    6 Buttonhead screw M3x10 pack of 10
    12 Buttonhead screw M3x12 pack of 10
    20 Lowprofile screw M5x10 pack of 25
    4 Lowprofile screw M5x15 pack of 25
    20 Lowprofile screw M5x20 pack of 25
    4 Lowprofile screw M5x25 pack of 25
    4 Lowprofile screw M5x30 pack of 25
    2 Lowprofile screw M5x50 pack of 10
    2 Lowprofile screw M5x65 pack of 10
    8 6mm spacers pack of 5
    8 9mm spacers pack of 5
    18 Tee nuts pack of 25
    Extra, handy to have
    1 Double Tee Nut pack of 10
    10 Drop In Tee Nuts, M5 per 1
    1 Precision Shim - 10x5x1mm pack of 10
     
  19. DeltaCon

    DeltaCon New
    Builder

    Joined:
    Mar 27, 2017
    Messages:
    14
    Likes Received:
    2
    Also I printed all "printed parts" for this build. I used eSun PLA+ for the first time and I really like it. The parts feel stiff and sturdy enough for a first try. I will probably switch some of the plates to aluminium when I feel the need. But for now I am continuing with the printed ones. All together it weighs 343 grams. I have printed it with a 0.6 nozzle, 0.7 extrusion width and a fixed 0.3 layer height.

    All printed parts.jpg
     
  20. DeltaCon

    DeltaCon New
    Builder

    Joined:
    Mar 27, 2017
    Messages:
    14
    Likes Received:
    2
    Since we can go nowhere (corona) I made some steps with this build. Th frames is mostly done, it it looks to be running smooth. That gives hope for the future!

    I made some different choice than the build owner:
    - enlarged the build to 1000 x 750mm, wthe the X-axis being the long one.
    - interconnected the 20x20 and 20x60 Y-rails, by drilling holes in the 20x60 and put in a screw that takes on a nut in the 20x20 rail. On the length of 750mm I drilled one hole in the middle, and 2 100mm from the edge. That makes the 20x20 (where the carriages actually slide on) sooo much more sturdy!
    - the screws on the lower part of the Y carriages are unreachable in case of ofjusting or maintainance. So I reversed the locknuct to the inside. A wrench can be used from below.
    - the X-carriage backplate I printed a second one, and left out the brass inserts. I decided that that makes it a lot easier to take off the carriage without taking apart the frame. I just use locknuts now.

    So far a pleasant experience. I will have to take on the controller now. I have an old Rambo laying around as a leftover after upgrading my Rostock Max v2. It has repetier installed, I will see if I can get Marlin on there.
    [​IMG]
     
    #20 DeltaCon, Mar 28, 2020
    Last edited: Mar 28, 2020
  21. Anthony Bolgar

    Anthony Bolgar Journeyman
    Builder

    Joined:
    Jan 14, 2016
    Messages:
    354
    Likes Received:
    198
    You are better off running GRBL for a laser, marlin lacks the ability to dynamically ramp power up and down for when it approaches corners, as well as not being supported by as many software packages as GRBL is.
     
  22. RobertR509

    Builder

    Joined:
    Dec 15, 2021
    Messages:
    1
    Likes Received:
    0
    In you totalizing am I understanding the number first is the quantity of the pack you mention? For example the first one a quantity of 6 10 packs if the M3x10 Button head screws? 20 25-packs seems a bit excessive
     

Share This Page

  1. This site uses cookies to help personalise content, tailor your experience and to keep you logged in if you register.
    By continuing to use this site, you are consenting to our use of cookies.
    Dismiss Notice